


The maps and software on your Polaris Off-Road Vehicle's touchscreen display can be updated using a computer and a USB. Note: Over the Air (Wi-Fi) map and software updates are not available on off-road vehicle displays at this time.
Before updating your seven-button display, syncing your rides and places is recommended. For more information and instructions, read Syncing RIDE COMMAND Data.
It is recommended that you use a USB drive that is 32GB and in exFAT® format. For help, read Formatting a USB to FAT32 or exFAT®.
To update the software and maps on the 2019+ 7" Display powered by RIDE COMMAND on your Polaris Off-Road Vehicle, follow these steps:
1. Visit the RIDE COMMAND website to access a list of vehicle display updates.
2. Select the display that corresponds to the one on your vehicle.
Updating Software
1. Click the button to download the most recent software.
2. The downloaded file does not need to be opened on your computer. It only needs to be copied to a USB drive.
3. Save the file to a removable USB drive. See above for USB size and format recommendations.
4. Plug the USB drive into your vehicle's USB cable and turn on the display. To identify your vehicle's USB cable location, refer to your Owner's Manual. Note: Make sure that the USB drive is fully inserted in the port.
5. Once the USB drive is plugged into the USB cable on your vehicle, turn on the display. Press the Polaris logo at the top of the screen. Tap SETTINGS. Tap GENERAL from the tabs on the left. Scroll down to UPDATE SOFTWARE.
6. Select the file you want to install. "Newest" will be automatically displayed next to the newest version detected on the USB drive.
7. The display will reboot and install the software.
8. It is recommended to always update the maps with current trails and points of interest (POIs) after you update the RIDE COMMAND software to ensure compatibility. Continue reading for instructions on updating the trails, POIs and base maps.
Updating Maps
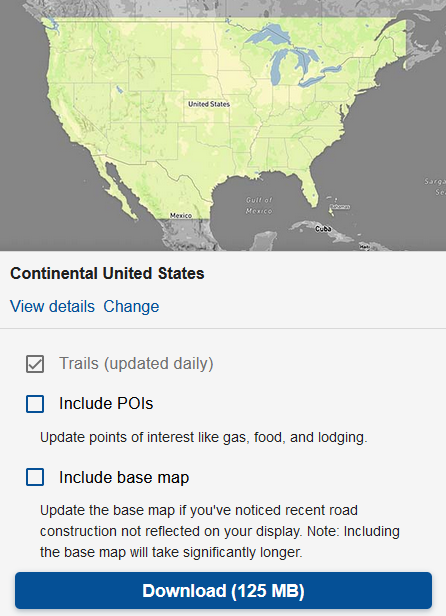
The maps update will be found on the right-hand side of the screen on the RIDE COMMAND Map and Software updates page. Trails are updated every day, so regular updates are recommended. Note: RIDE COMMAND does not support third-party maps.
1. Download your selected map region. You do not need to include the base map if you are already seeing roads and base map details on your display. Note: Including the base map will take significantly longer to download to the flash drive and upload to your vehicle. It is recommended to include the base map if there have been a lot of local road changes or if the version is dated prior to 4/24/2020.
2. Once downloads are complete, drag and drop the file(s) onto your USB drive. See above for USB size and format recommendations. The file or files do not need to be opened on your computer. It only needs to be copied to a USB drive. Note: Both the software and maps files can be on your USB drive at the same time. The display will select the proper file.
![]()
3. Plug the USB drive into your vehicle's USB cable. To identify your vehicle's USB cable location, refer to your Owner's Manual. If you are also updating the base map, connect the vehicle to a trickle charger to avoid depleting the battery. Read Battery Charging and Maintenance Tips for Polaris Off-Road Vehicles for help. Note: Make sure that the USB drive is fully inserted in the port.
4. Turn on the display. Press the Polaris logo at the top of the screen. Tap SETTINGS > GENERAL from the tabs on the left. Scroll down to UPDATE MAPS/TRAILS.
5. Select the file you want to install.
6. The display will reboot and install the updated maps. This process may take a while depending on the speed of your USB drive.
See the video below for more details on uploading the new software to your 7" Display powered by RIDE COMMAND.
Error Messages and Troubleshooting
If an error occurs, perform one or all of the following actions to resolve the issue.
- Remove and reconnect the USB flash drive securely. Make sure that it is fully seated in the port.
- Make sure the display files are not inside a folder on the flash drive.
- Make sure only display files are on the flash drive. Remove any other files if necessary.
- Try using a different USB flash drive.
- Ensure the capacity of data on the USB drive is larger than 1GB and smaller than 64GB.
- Re-format the flash drive to the correct format (FAT32 or exFAT®). Re-download the update(s) from the RIDE COMMAND website. Drag and drop the file(s) into the flash drive folder.
For more information on the seven-button RIDE COMMAND display, consult the 7" Display User Guide and Quick Start Guide.
If you need help updating the five-button display, read Updating Software and Maps on the 2017-2018 7" Display Powered by RIDE COMMAND.
To browse all RIDE COMMAND articles, read Guide to RIDE COMMAND for Off-Road Vehicles.
Visit the RIDE COMMAND website for additional information about features, displays and software/map updates.
exFAT® is a registered trademark of Microsoft Corporation
YouTube® is a registered trademark of Google LLC
Unless noted, trademarks are the property of Polaris Industries Inc.
© 2023 Polaris Industries Inc.


