


| Required Tools and Supplies | |
| Drain Pan | Shop Rags |
| Nitrile Gloves | Safety Glasses |
| Funnel | Torque Wrench |
| 6mm Allen Socket | 8mm Socket |
| Ratchet | Grease Gun |
| Safety Glasses | Nitrile Gloves |
To learn more about tools, read the Tools and Fasteners Guide.
Always wear safety glasses and nitrile gloves while servicing your Polaris GENERAL. The Full Synthetic PS-4 Oil Change Kit is part number 2879323. The Extreme Duty Oil Change Kit is part number 2890057.
To change the oil and filter on your 2020+ GENERAL XP 1000 or XP 4 1000, follow these steps:
1. Park the vehicle on a flat level surface.
2. Ensure the vehicle is in PARK.
3. Start the engine and allow it to warm up at idle for 2 to 3 minutes.
4. Stop the engine.
5. Tilt the cargo bed to access the oil cap.
6. Remove any debris near the engine oil cap and remove the oil cap.
7. Clean the area around the oil drain plug.
8. Place a drain pan under the engine crankcase. Tip: Place a rag in the bottom of the drain pan to prevent the splashing of oil.
9. Remove the drain plug with a 6mm Allen socket and allow the oil to drain completely. Caution: Hot oil can cause burns to skin. Do not allow hot oil to contact skin.
10. While the oil is draining, turn the oil filter counterclockwise with a 2.5-inch (64mm) oil filter wrench to remove it.
11. Using a clean dry cloth, clean the filter sealing surface on the engine crankcase.
12. Lubricate the O-ring on the new oil filter with a film of fresh engine oil. Ensure the O-ring is in good condition.
13. Install the new filter and rotate it clockwise by hand until the filter gasket contacts the sealing surface. Then turn it an additional three quarters of a turn. The filter is part number 2540086. The filter is included in both oil change kits.
14. Replace the sealing washer on the drain plug. The sealing washer is part number 5812232. Notice: The sealing surfaces on the drain plug and crankcase should be clean and free of burrs, nicks or scratches.
15. Reinstall the engine oil drain plug. Torque to 12 ft-lbs (16 Nm).
16. Fill the engine with 2.5 quarts (2.4 liters) of engine oil.
17. Start the engine and allow it to idle for 1 to 2 minutes.
18. Stop the engine and inspect for leaks.
19. Clean any residual oil off the vehicle.
20. Remove the dipstick and wipe with a clean shop towel.
21. Reinstall the dipstick fully and remove again to check the oil level. Add oil as needed to bring the level to the upper mark on the dipstick.
22. Lower the cargo box.
23. Dispose of the used filter and oil properly.
24. In addition to changing the engine oil, make sure to grease the propshaft and clean the spark arrestor.
25. Access the grease zerks on the propshaft through the driver’s rear wheel well and through the access hole in the middle of the skid plate.
26. To remove the spark arrestor, loosen the spark arrestor fastener with an 8mm socket, and pull the spark arrestor out to clean.
27. Reinstall the spark arrestor and fastener. Torque to 8 ft-lbs (11 Nm).
Programmable Service Interval on Instrument Cluster
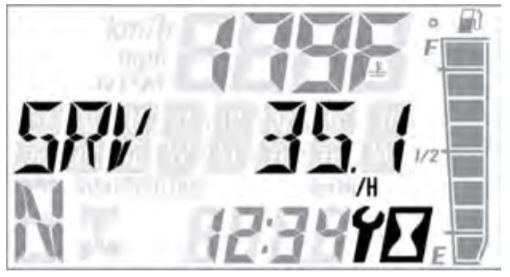
The service interval counter on the instrument cluster of your GENERAL is programmed to 25 hours at the factory. As hours of engine operation increase, the counter decreases. The wrench icon will flash for about 10 seconds when the counter reaches zero and each time the key is turned on thereafter until the counter is reset.
When this feature is enabled, it provides a convenient reminder to perform routine maintenance. Refer to the recommended oil change intervals.
To reset or change the service interval:
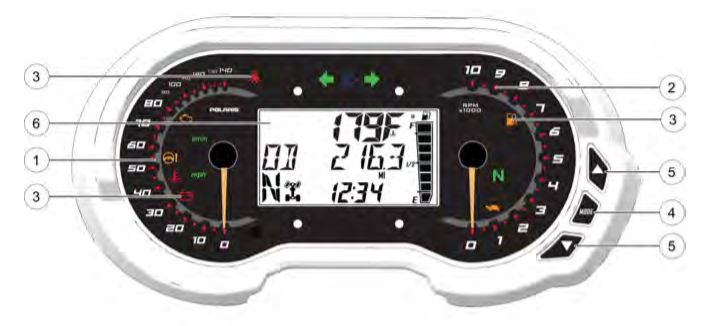
1. Press and hold the MODE (4) button to enter the settings menu.
2. Press either toggle button (5) to cycle to the "Service Hours" option. Press MODE to select.
3. Press MODE to reset the existing value and exit or press either toggle button to change the value. Press MODE to save and exit the settings menu.
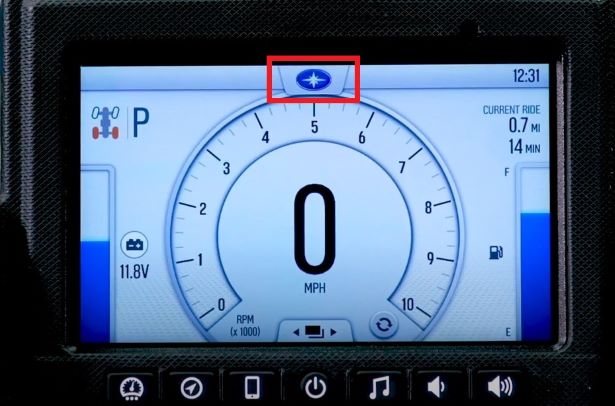
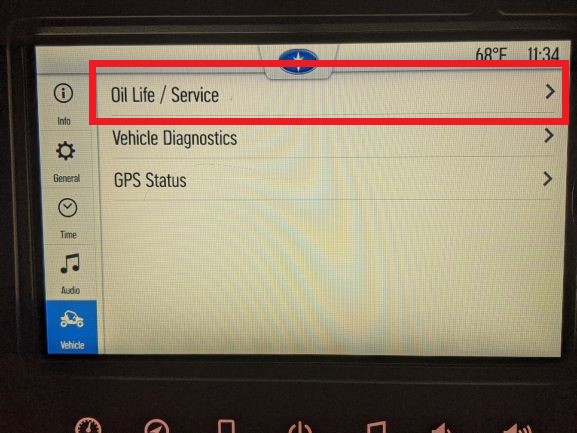
Programmable Service Interval on Seven-Button Ride Command Display
To reset the interval on a seven-button Ride Command display:
1. Select the Settings button.
2. In settings, select the Vehicle tab.
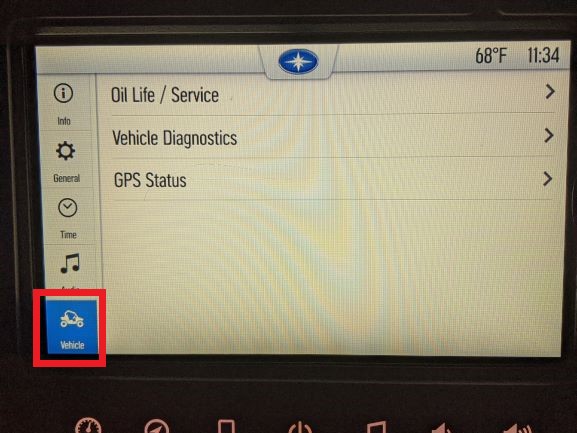
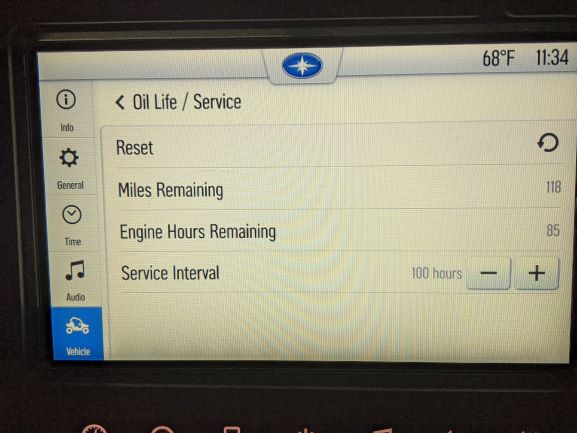
3. Select OIL LIFE/SERVICE.
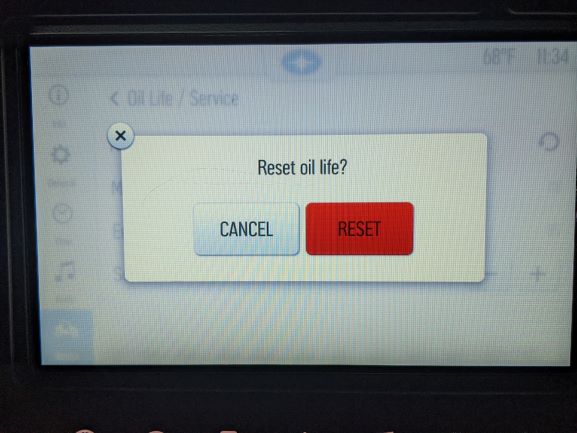
4. Select RESET.
5. Confirm the reset by tapping the red RESET button.
For more information, see your authorized Polaris Dealer. Find a dealer near you with the Dealer Locator.
Maintenance tips, procedures and specifications can be found in your Owner's Manual.
To find diagrams and replacement part numbers, use the online parts catalog.
YouTube® is a registered trademark of Google LLC
Unless noted, trademarks are the property of Polaris Industries Inc.
© 2022 Polaris Industries Inc.


