Note: This article applies to Pro XD 2000G and Pro XD 4000G vehicles, which are now named Pro XD Full-Size Gas and Pro XD Full-Size Gas Crew, respectively. For newer vehicles, read 2023+ Pro XD Full-Size Gas Oil and Filter Change.
Always check and change the oil at the intervals outlined in the Periodic Maintenance Chart in your Owner's Manual. Always use the recommended engine oil. Always change the oil filter whenever changing oil.
The recommended oil is PS-4 Full Synthetic 5W-50 All-Season Engine Oil, part number 2876244 for one quart and part number part number 2876245 for one gallon.
Oil change kits are also available, which include a new oil filter and the recommended fluid for your vehicle. The oil change kit is part number 2879323.
Pay special attention to the oil level. A rise in oil level during cold weather can indicate contaminants collecting in the oil sump or crankcase. Change oil immediately if the oil level begins to rise. Monitor the oil level, and if it continues to rise, discontinue use and determine the cause. Your dealer can assist. WARNING: Vehicle operation with insufficient, deteriorated, or contaminated engine oil will cause accelerated wear and may result in engine seizure, accident and injury.
NOTICE: Mixing brands or using a non-recommended oil may cause serious engine damage. Always use the recommended oil.
Engine Oil Check
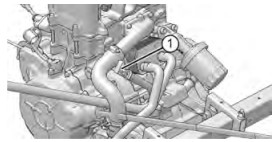
The oil dipstick is located on the engine. Access the dipstick through the right rear wheel well.
To check the oil, do the following:
1. Position vehicle on a level surface and place the transmission in PARK.
2. Stop the engine and allow it to cool down before removing the dipstick.
3. Raise the cargo box. Unlock the dipstick lever (1). Remove the dipstick and wipe it dry with a clean cloth.

4. Reinstall the dipstick and push it into place. Do not lock the dipstick. NOTE: Make certain the dipstick is inserted all the way into the dipstick tube to keep the depth of the dipstick consistent.
5. Remove the dipstick and check the oil level.
6. Add the recommended oil as necessary to bring the oil level within the SAFE range on dipstick. Do not overfill. NOTE: A rising oil level between checks during cold weather operation can indicate contaminants such as gas or moisture collecting in the crankcase. If the oil level is over the upper mark, change the oil immediately.
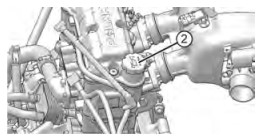
7. With the cargo box raised, add engine oil through the oil fill cap (2), shown above, located on top of the valve cover, under the cargo box.

8. When finished, reinstall dipstick and lock the lever. Lower the cargo box and secure in position.
9. Check for oil leaks.
Engine Oil and Filter Replacement
The engine oil dipstick is located on the right front side of the engine. The engine oil fill cap is located on top of the valve cover. Access the oil dipstick and oil fill cap by tilting the rear cargo box.
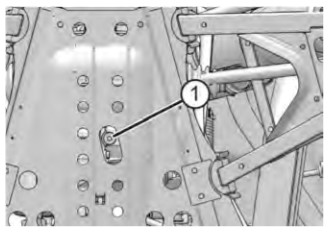
The crankcase drain plug is located on the bottom of the crankcase. Access the drain plug through the skid plate access hole located directly under the crankcase.
1. Position vehicle on a level surface and place the transmission in PARK.
2. Stop the engine and allow it to cool down.
3. Clean the area around the crankcase drain plug (1). Caution: Use caution when performing this procedure. Do not allow hot engine oil to come into contact with skin, as serious burns may result.

4. Place a drain pan under the engine crankcase and remove the drain plug. Allow the oil to drain completely.
5. Remove all cargo from the cargo box. Caution: Always remove all cargo from the cargo box before lifting the box to access the engine.
6. Pull up on the cargo box release lever to tilt the box.
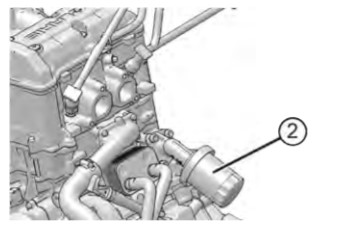
7. Using the Oil Filter Wrench, turn the oil filter (2) counterclockwise to remove it.

8. Using a clean, dry cloth, clean the filter sealing surface on the engine crankcase.
9. Lubricate the O-ring on the new oil filter with a film of fresh engine oil and install. The oil filter replacement is part number 2540086. Check to make sure the O-ring is in good condition.
10. Install the oil filter by hand turning until the O-ring contacts sealing surface. Turn an additional 3/4-turn.
11. Replace the sealing washer on drain plug. Note: The sealing surface on the drain plug should be clean and free of burrs, nicks or scratches.
12. Reinstall the engine crankcase drain plug. Torque the drain plug to 12 ft-lbs (16 Nm).
13. Remove oil fill cap. Fill engine with recommended engine oil. The engine oil capacity is 2.5 qt (2.4 L).
14. Verify the transmission is still in PARK.
15. Start the engine and allow it to idle for 30 seconds.
16. Stop the engine and inspect for oil leaks. Wait at least 15 seconds before removing the dipstick.
17. Unlock the dipstick lever. Remove the dipstick and wipe it dry with a clean cloth.
18. Reinstall the dipstick and push it into place. Do not lock the dipstick. Note: Make certain the dipstick is inserted all the way into the dipstick tube to keep the depth of the dipstick consistent.
19. Remove the dipstick and check the oil level.
20. Add the recommended oil as necessary to bring the oil level within the SAFE range on dipstick. Do not overfill.
21. When finished, reinstall the oil fill cap, oil dipstick and lock the lever.
22. Dispose of used oil and filter properly.
Oil Part Numbers
The recommended oil for your Pro XD is Polaris PS-4 5W-50 4-Cycle Oil or a similar oil. The engine oil capacity on your Pro XD is 2.5 qt (2.4 L).
| PS-4 Engine Oil | Size | Quantity | Part Number |
| 1 qt (0.95 L) | 12 | 2876244 | |
| 2 qt (1.90 L) | 8 | 2877490 | |
| 1 gal (3.8 L) | 4 | 2876245 |
Oil may need to be changed more frequently if Polaris PS-4 engine oil is not used. Follow the manufacturer's recommendations for ambient temperature operation.
To purchase oil and parts visit the online parts catalog.
For more information and maintenance procedures, refer to your Owner's Manual.
For more information or service, see your Polaris Dealer. To find a dealer near you, use the Dealer Locator.
Unless noted, trademarks are the property of Polaris Industries Inc.
© 2022 Polaris Industries Inc.


