


Poor lighting can result in reduced visibility when driving. Headlight and taillight lenses become dirty during normal operation of your Polaris ATV. Clean headlights frequently and replace burned out headlamps promptly. Always make sure lights are adjusted properly for best visibility.
When servicing a halogen lamp, avoid touching the lamp with bare fingers. Oil from your skin leaves a residue, causing a hot spot that will shorten the life of the lamp. If fingers do touch a lamp, clean it with denatured alcohol. Hot components can cause burns to skin. Allow lamps to cool before servicing.
Note that if your vehicle has LED headlamps, the entire assembly must be replaced. See your authorized Polaris Dealer for assistance.
Headlight Lamp Replacement for Sportsman 450 and 570 Models with Halogen Lamps
1. Remove the seven headlight pod screws. Pull the pod cover forward.
2. Unplug the headlamp from the wiring harness. Be sure to pull on the connector, not on the wiring.
3. Turn the lamp counter-clockwise to remove it.
4. Apply dielectric grease to the socket and install the new lamp. Make sure the tab on the lamp locates properly in the housing. The bulb is part number 4010253.
5. Reassemble the pod.
Headlight Lamp Replacement for Sportsman 850, XP 1000 and XP 1000 S Models with Halogen Lamps
1. Remove the four headlight pod screws. Pull the pod cover forward.
2. Unplug the headlamp from the wiring harness. Be sure to pull on the connector, not on the wiring.
3. Turn the lamp counter-clockwise to remove it.
4. Install the new lamp. Make sure the tab on the lamp locates properly in the housing. The bulb is part number 4010253.
5. Reassemble the pod.
Headlamp Replacement for Scrambler 850, XP 1000 and XP 1000 S Models
If an LED headlight becomes damaged or inoperable, the entire headlight assembly must be replaced.
Lower Headlamp Replacement for All Models with Halogen Lamps
1. Turn the back of the headlight harness counter-clockwise and pull the harness assembly away from the headlight assembly.
2. Remove the headlamp and install the new headlamp. The bulb is part number 4010253. for Sportsman models and part number 4012279 for Scrambler models.
3. Reinstall the harness assembly into the headlight assembly. Note: Take care to avoid touching the glass on the new headlight bulb. Fingerprints on the glass may result in premature failure.
4. Turn the headlight harness clockwise to secure the headlamp.
High Beam Adjustment for All Models
The headlight beam can be adjusted slightly upward or downward. Use the following procedure to make the adjustment.
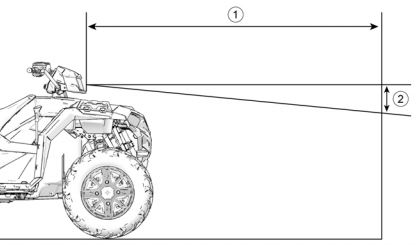
1. Position the vehicle on a level surface with the headlight approximately 25 feet (7.6 m) from a wall (1). Place the transmission in PARK.
2. Measure the distance from the floor to the center of the headlight and make a mark on the wall at the same height.
3. Start the engine. Turn the headlight switch to high beam.
4. Observe the headlight aim on the wall. The most intense part of the headlight beam should be 2 inches (5 cm) below the mark on the wall (2). Include rider weight on the seat when measuring.
For Sportsman 450 and 570 models: The adjustment screw is located on the right side of the headlight pod. To adjust the beam, loosen the screw. Adjust the headlamp to the desired position and then tighten the screw.
For Sportsman 850, XP 1000 and XP 1000 S models: The adjustment screw is located on the left side of the headlight pod. To adjust the beam, loosen the screw. Adjust the headlamp to the desired position and then tighten the screw.
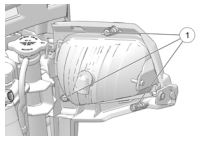
For Scrambler 850 and XP 1000 models (shown below): The headlight beam can be adjusted horizontally and vertically. Tighten or loosen one or more of the three headlight adjustment screws (1), as shown below, to adjust the beam upward or downward or to the left or right.
Low Beam Adjustment for Sportsman 450 and 570 Models
The low beam can be adjusted slightly upward or downward.
1. Loosen the Phillips screw. Location varies based on model year, as shown below.
2. Tilt the headlamp upward or downward.
3. Tighten the screw.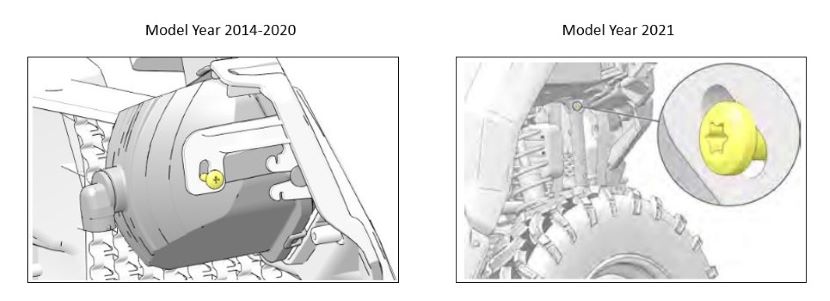
Low Beam Adjustment for Sportsman 850, XP 1000 and XP 1000 S Models
Open the front rack to access the adjustment screw. Adjust the beam to the desired position by tightening or loosening the screws at the top of the lights, as shown below. Adjust each light independently.
Headlight Housing Replacement for Sportsman 450 and 570 Models
To replace the headlight housing, do the following:
1. Remove the seven headlight pod screws.
2. Pull the pod cover forward.
3. Unplug the headlamp from the wiring harness.
4. Use a small screwdriver to remove the O-rings from the headlight mounting tabs.
5. Pull the headlight housing up from bracket for removal.
6. Reverse the steps to install the new housing and reassemble the pod.
Headlight Housing Replacement for Sportsman 850 and XP 1000 Models
1. Remove the four headlight pod screws.
2. Pull the pod cover forward.
3. Unplug the headlamp from the wiring harness.
4. Use a small screwdriver to remove the O-rings from the headlight mounting tabs.
5. Pull the headlight housing up from the bracket for removal.
6. Reverse the steps to install the new housing and reassemble the pod.
For more information, see your authorized Polaris Dealer. Find a dealer near you with the Dealer Locator.
Maintenance tips, procedures and specifications can be found in your Owner's Manual.
To find diagrams and replacement part numbers, use the online parts catalog.
Unless noted, trademarks are the property of Polaris Industries Inc.
© 2022 Polaris Industries Inc.


