


The following information applies to Switchback Assault, Switchback SP, 600 RMK 144, 600 Voyageur, SKS 146, INDY XC 129 and 600 INDY SP models.
Your Polaris snowmobile’s suspension can be adjusted to fit your individual riding style. For full details on adjustments, see your Owner’s Manual.
Front and Rear Suspension
The front and rear suspension are easy to adjust. Follow these three steps:
1. Ride your snowmobile. Ride the snowmobile in various terrain to fully experience the existing suspension settings before making any adjustments.
2. Adjust the rear spring to tune vehicle balance. After riding, you should be able to determine if the snowmobile needs more or less transfer. For more transfer, decrease the torsion spring preload. For less transfer, increase the torsion spring preload.
If you prefer your snowmobile has lighter steering, decrease the torsion spring preload or increase the front track shock spring preload.
3. Adjust shock clickers (if equipped) for ride quality. For models equipped with monotube shocks, always adjust the rear torsion spring preload to enhance bottoming resistance.
For models with short clickers, you can adjust the clickers to control bottoming and adjust ride comfort.
Turn a clicker counter-clockwise to decrease damping for a softer ride. Turn a clicker clockwise to increase damping for a stiffer ride and less bottoming. Always adjust the clicker at least one click below full stiff (full clockwise) or shock damage will occur.
Test the snowmobile and continue making spring and clicker adjustments until you achieve the perfect ride. Adding traction components, such as traction studs are additional ski skag carbides, or changing the factory equipped track, could change handling characteristics. Additional setup may be required.
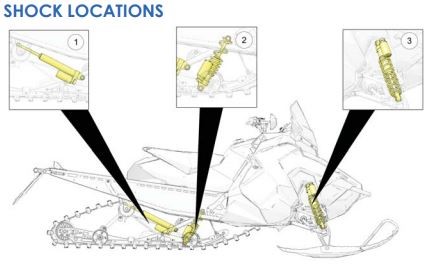
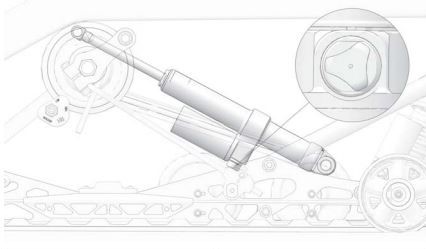
(1) Rear Track Shock
(2) Front Track Shock
(3) Front IFS Shock
Shock Compression Damping
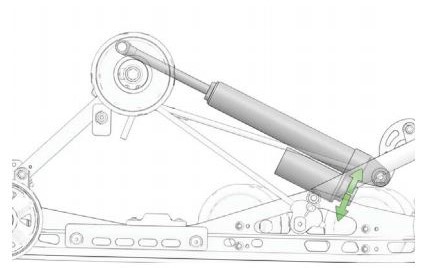
The primary adjustment for overall vehicle balance is RTS spring preload. Perform this adjustment first. After adjusting RTS spring preload to your satisfaction, compression damping adjustments can be made to control ride quality and bottoming resistance.
Compression damping can be adjusted at the front suspension and at the rear track shock. Make adjustments in two-click increments and then test ride. When adjusting the front suspension, always adjust both clickers equally.
To stop bottoming of the front or rear suspension (stiffer ride), rotate the clicker(s) clockwise two clicks (as viewed from the top of the clicker) and then test ride. Repeat the adjustment until bottoming stops and the desired ride quality is achieved.
For a more plush ride at the front or rear suspension, rotate the clicker(s) counter-clockwise two clicks and then test ride. Repeat the adjustment until the desired ride quality is achieved.
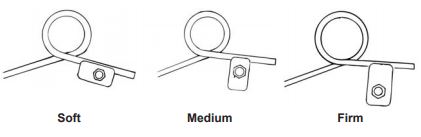
Torsion Spring Adjustments
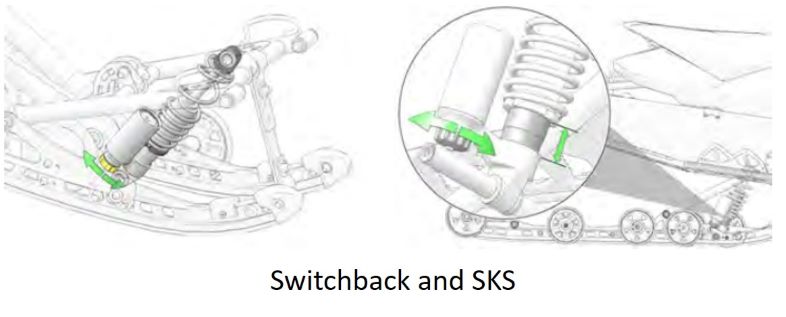
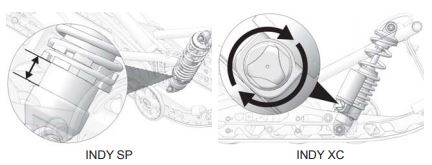
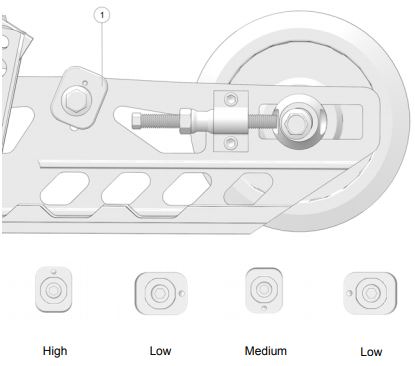
To adjust rear torsion spring preload, rotate the three-position cam using the engine spark plug tool. Adjustment is easiest when the cam is rotated from low to medium and then to high. Rotating directly from low to high will require significantly more effort. Different rate torsion springs are available if a firmer ride is desired. See your Dealer for more information.
See the diagram below that corresponds with your model of snowmobile.
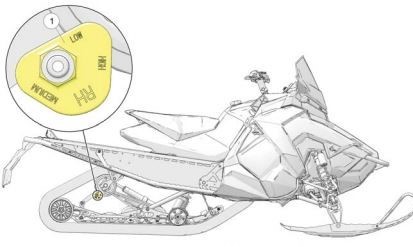
To adjust rear torsion spring preload, rotate the three-position cam (1) using the engine spark plug tool. Adjustment is easiest when the cam is rotated from low to medium, and then to high. Rotating directly from low to high will require significantly more effort. Different rate torsion springs are available if a firmer ride is desired. See your dealer for more information. Note: Adding 1 + 1 seat, or additional cargo may affect handling and require a spring rate change.
Torsion Spring Setting | Recommended Usage |
|---|---|
Low | Rider(s) and gear = 140-180 lbs. If less than 140, use the optional spring chart for softer springs |
Medium | Rider(s) and gear = 180-220 lbs. |
High | Rider(s) and gear = 220-260 lbs. If above 260, use the optional spring chart for heavier springs. |
Optional Springs
If the correct balance cannot be obtained by adjusting the stock springs, please install the appropriate optional heavy or light springs listed below.
| Part Number | Spring Type | Description |
|---|---|---|
| 7041942-329 | Spring, Torsion | .375/77, BLK, LH, HEAVY |
| 7041943-329 | Spring, Torsion | .375/77, BLK, RH, HEAVY |
| 7041627-067 | Spring, Torsion | .347/77, BLK, LH, LIGHT |
| 7041628-067 | Spring, Torsion | .347/77, BLK, LH, LIGHT |
| Part Number | Spring Type | Description |
|---|---|---|
| 7043859-329 | Spring, Torsion | 10# LH Light Duty |
| 7043860-329 | Spring, Torsion | 10# RH Light Duty |
| 7045207-329 | Spring, Torsion | 13# LH Heavy Duty |
| 7045208-329 | Spring, Torsion | 13# RH Heavy Duty |
| 7045209-329 | Spring, Torsion | 14# LH Extra Heavy Duty |
| 7045210-329 | Spring, Torsion | 14# RH Extra Heavy Duty |
Rear Track Shock Factory Clicker Settings
| Model | Clicker Setting (From Full Soft) |
|---|---|
| Switchback Assault | 8 |
| SKS 146 | 8 |
| Model | Factory Clicker Setting (From Full Stiff) |
|---|---|
| INDY XC | 5 |
Front Track Shock Spring Settings
Factory settings, combined with user adjustments to the rear torsion spring, should be all that’s necessary to provide the best riding experience for most riders. The primary adjustment for overall vehicle balance is the rear torsion spring preload. Perform this adjustment first.
Always perform shock spring preload adjustments with the weight of the snowmobile removed from the shock and with the shock at full extension. Never adjust spring preload to an installed length longer than the factory length or shorter than the minimum length as shown in the following chart. Damage to the suspension could result. When decreasing preload, make sure at least two turns of preload are holding the retainer against the spring.
See the diagrams and charts below that apply to your model.
| Factory Spring | Maximum Installed Length | Minimum Installed Length |
|---|---|---|
Switchback ASSAULT SKS 146 | 1.25" (3.2 cm) | 1" (2.5 cm) |
Switchback SP | 2" (5 cm) | 1.75" (4.5 cm) |
600 RMK 144 | Not adjustable | Not adjustable |
600 Voyageur | Not adjustable | Not adjustable |
| Factory Spring | Maximum Installed Length | Minimum Installed Length |
|---|---|---|
| INDY SP | 1.25" (3.2 cm) | 0.75" (1.9 cm) |
| INDY XC | 1.88" (4.8 cm) | 1.38" (3.5 cm) |
| INDY XCR | 2.12" (5.4 cm) | 1.62" (4.1 cm) |
| Front Track Factory Clicker Settings | |
|---|---|
| Model | Clicker Setting (From Full Soft) |
| Switchback ASSAULT | 2 |
| SKS 146 | 2 |
| Model | Clicker Setting (From Full Hard) |
|---|---|
| INDY SP | N/A |
| INDY XC | 5 |
| INDY XCR | Low: 6 High: 5 |
Front Suspension (IFS) Shock Adjustments (If Equipped)
Always perform shock spring preload adjustments with the weight of the snowmobile removed from the shock and with the shock at full extension.
To reset IFS clickers, rotate the clicker to full stiff and then back off the same number of clicks for each shock.
| IFS Shock Spring Settings | ||
|---|---|---|
| Factory Spring | Factory Installed Length | Minimum Installed Length |
| INDY SP | 10.75" (27.3 cm) | 10" (25.4 cm) |
| INDY XC | 10" (25.4 cm) | 10" (25.4 cm) |
| INDY XCR | 9.75" (24.8 cm) | 9.25" (23.5 cm) |
| Switchback ASSAULT | 10" (25.4 cm) | 9.5" (24 cm) |
| SKS 146 | 10" (25.4 cm) | 9.5" (24 cm) |
| Switchback SP | 10" (25.4 cm) | 9.5" (24 cm) |
| 600 RMK 144 | 10.5" (26.7 cm) | 10" (25.4 cm) |
| 600 Voyageur | 10.5" (26.7 cm) | 10" (25.4 cm) |
| IFS Remote Reservoir Shock Factory Clicker Settings | |
|---|---|
| Model | Clicker Setting (From Full Hard) |
| INDY SP | N/A |
| INDY XC | 12 |
| INDY XCR | Low: 6 High: 5 |
| Switchback ASSAULT | 6 |
| SKS 146 | 6 |
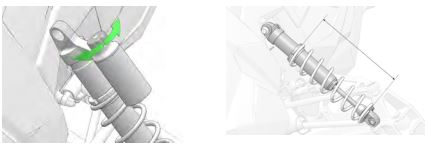
Cornering Adjustments
To improve cornering ability, remove up to ½ inch of preload from factory IFS spring setting. Trade-off for removing ½ inch of preload will add steering effort.
Limiter Strap Adjustment
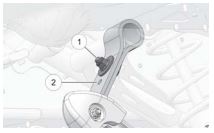
The front torque arm limiter strap is set at position (1). Polaris recommends leaving the limiter strap length at position (1) to maintain the optimum ride characteristics of the snowmobile. Riders who desire less ski pressure and more weight transfer toward the rear of the snowmobile can lengthen the limiter strap by changing to position (2).
1. Loosen the lock nut.
2. Adjust the limiter strap.
3. Tighten the lock nut. Torque to 16 ft-lbs (21 Nm).
Rear Rear Scissor Stop (RRSS) If Equipped
The rear rear scissor stop (RRSS) couples the movement of the rear torque arm with the front torque arm and limits the amount of independent movement between the rear torque and the front torque arm.
Adjusting the RRSS either allows more weight to transfer to the rear for more traction, or allows less weight to transfer to the rear, resulting in improved cornering performance. An adjustment dot is located on the RRSS. This dot is on the longest end of the scissor stop.
Moving the RRSS to a higher position will have the following effects on the suspension:
- Reduced weight transfer
- Improved chatter bump ride
- Improved cornering performance
- Increased load carrying capacity (2-up)
RRSS Weight Transfer During Acceleration
The preferred method for controlling weight transfer during acceleration is by adjusting the RRSS. Use the scissor stop tool located in your tool kit to make the adjustments.
To decrease weight transfer under acceleration (for improved cornering), rotate the stop to a higher position.
To increase weight transfer or ski lift during acceleration, move the stop to the rearward upper position. The stop may also be rotated to a lower position for even more weight transfer if desired.
- Low Position: This setting will increase weight transfer.
- Medium Position: This setting is the production setting and will provide the best overall trail riding.
- High Position: This setting will decrease weight transfer.
- Rearward Upper Position: Optional hole location. This setting will increase transfer.
The preferred method for controlling weight transfer during acceleration is by adjusting the RRSS. The factory setting is the best for most trail riding conditions.
To decrease weight transfer under acceleration (for improved cornering), rotate the RRSS to a higher position.
To increase weight transfer or ski lift during acceleration, rotate the RRSS to a lower position.
Tip: Your dealer can help you with initial setup and additional setup instructions to help you achieve your optimum ride. A scissor stop tool is also available from your dealer.
To find a Polaris Dealer near you, use the Dealer Locator.
For more maintenance tips, procedures and specifications, consult your Owner's Manual.
To find diagrams and replacement part numbers, view the online parts catalog.
Unless noted, trademarks are the property of Polaris Industries Inc.
© 2022 Polaris Industries Inc.

