


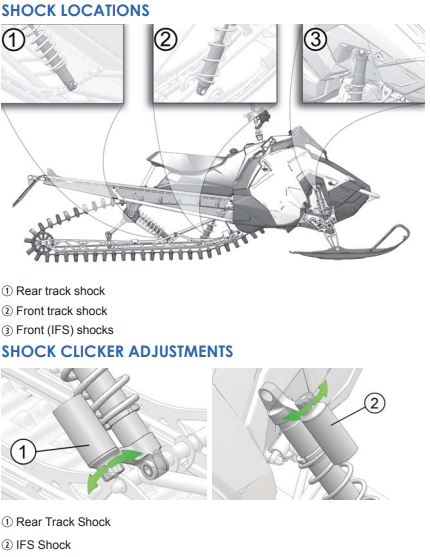
The following information applies to 2022 and older AXYS Pro-RMK, RMK KHAOS, RMK Assault and SKS 155 models.
Your Polaris snowmobile’s suspension can be adjusted to fit your individual riding style. For full details on adjustments, see your Owner’s Manual.
On AXYS snowmobiles, the front and rear suspension are easy to adjust. Follow these three steps:
1. Ride your snowmobile. Ride the snowmobile in various terrain to fully experience the existing suspension settings before making any adjustments.
2. Adjust the rear spring to tune vehicle balance. After riding, you should be able to determine if the snowmobile needs more or less transfer. For more transfer, decrease the rear track spring preload. For less transfer, increase the rear track spring preload.
If you prefer your snowmobile has lighter steering, decrease the rear track spring preload or increase the front track shock spring preload.
3. Adjust shock clickers (if equipped) for ride quality. For models equipped with monotube shocks, always adjust the rear track shock spring preload to enhance bottoming resistance. For models with short clickers, you can adjust the clickers to control bottoming and adjust ride comfort.
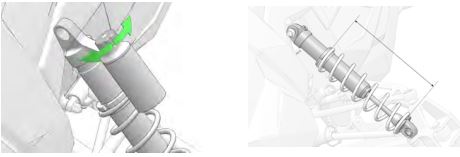
Turn a clicker counter-clockwise to decrease damping for a softer ride. Turn a clicker clockwise to increase damping for a stiffer ride and less bottoming. Always adjust the clicker at least one click below full stiff (full clockwise) or shock damage will occur.
Test the snowmobile and continue making spring and clicker adjustments until you achieve the perfect ride.
Shock Compression Damping (SKS, RMK KHAOS, RMK Assault, Optional for PRO-RMK)
The primary adjustment for overall vehicle balance is RTS spring preload. Perform this adjustment first. After adjusting RTS spring preload to your satisfaction, compression damping adjustments can be made to control ride quality and bottoming resistance.
Compression damping can be adjusted at the front suspension and at the rear track shock. Make adjustments in two-click increments and then test ride. When adjusting the front suspension, always adjust both clickers equally.
To stop bottoming of the front or rear suspension (stiffer ride), rotate the clicker(s) clockwise two clicks (as viewed from the top of the clicker) and then test ride. Repeat the adjustment until bottoming stops and the desired ride quality is achieved.
For a more plush ride at the front or rear suspension, rotate the clicker(s) counter-clockwise two clicks and then test ride. Repeat the adjustment until the desired ride quality is achieved.
Front Suspension (IFS) Shock Adjustments
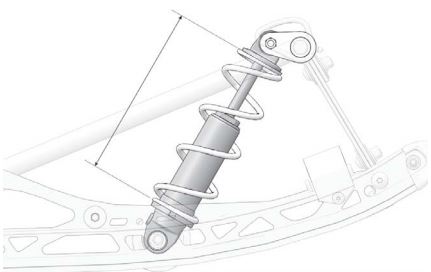
Always perform shock spring preload adjustments with the weight of the vehicle removed from the shock and with the shock at full extension.
To reset IFS clickers, rotate the clicker to full stiff and then back off the same number of clicks for each shock.
| FACTORY SPRING | FACTORY INSTALLED LENGTH | MINIMUM INSTALLED LENGTH |
| PRO-RMK Monotube | 10.25" (26 cm) | 9.75" (24.8 cm) |
| RMK KHAOS | 10.25" (26 cm) | 9.75" (24.8 cm) |
| SKS/PRO-RMK w/ Clicker | 10.25" (26 cm) | 9.75" (24.8 cm) |
| RMK ASSAULT | 10.75" (27.3 cm) | 10.5" (26.7 cm) |
IFS Remote Reservoir Shock Factory Clicker Settings
| MODEL | CLICKER SETTING (FROM FULL STIFF) |
| PRO-RMK w/ Clicker | 10 |
| RMK KHAOS | High-Speed: 4 Low-Speed: 6 |
| SKS | 10 |
| RMK ASSAULT | 10 |
Front Track Shock Spring Settings
Factory settings, combined with user adjustments to the rear track shock spring (RTSS) should be all that’s necessary to provide the best riding experience for most riders. The primary adjustment for overall vehicle balance is RTSS preload. Perform this adjustment first.
Always perform shock spring preload adjustments with the weight of the vehicle removed from the shock and with the shock at full extension. Never adjust spring preload to an installed length longer than the factory length or shorter than the minimum length as shown in the following chart. Damage to the suspension could result. When decreasing preload, make sure at least two turns of preload are holding the retainer against the spring.
| FACTORY SPRING | MAXIMUM INSTALLED LENGTH | MINIMUM INSTALLED LENGTH |
| PRO-RMK | 8.375" (21.3 cm) | 8.2" (20.8 cm) |
| RMK KHAOS | 6.5" (16.5 cm) | 6.25" (15.9 cm) |
| SKS | 8.375" (21.3 cm) | 8.2" (20.8 cm) |
| RMK ASSAULT | 8.375" (21.3 cm) | 8.2 (20.8 cm) |
Front Track Shock Factory Clicker Settings
| MODEL | FACTORY CLICKER SETTING (FROM FULL STIFF) |
| RMK KHAOS | Low-Speed: 6 High-Speed: 4 |
Rear Track Shock Spring Settings
For riders who weight 160-220 pounds (73-100 kg), test ride at factory settings and then make fine-tuning adjustments. See the following initial RTS Shock Preload Settings table.
For riders outside the 160-220 pounds weight range, adjust the factory-set preload to the following installed lengths as a starting point and then test ride before making adjustments. Do not exceed the minimum and maximum installed length requirements. See the following initial RTS Shock Preload Settings table.
Always perform shock spring preload adjustments with the weight of the vehicle removed from the shock and with the shock at full extension. If adjustments to the factory-installed springs are not sufficient for riders over 300 pounds, optional stiffer springs are available. See your Polaris Dealer for assistance.
Do not install accessory bogie wheels on the inside of the rail beams if your model is equipped with a remote reservoir rear track shock or damage will occur. The rail scratchers must first be removed. They will interfere with the accessory bogie wheels.
Rear Track Shock Factory Clicker Settings
| MODEL | CLICKER SETTING (FROM FULL STIFF) |
| PRO-RMK w/ Clicker | 13 |
| RMK KHAOS | High-Speed: 4 Low-Speed: 6 |
| SKS | 13 |
| RMK ASSAULT | 10 |
Initial RTS Shock Preload Settings
Measure the spring length with the suspension off the ground.
For factory installed springs:
Rider weight of less than 160 pounds (73 kg)
| Model | Factory Installed Length | Minimum Installed Length |
| SKS/PRO-RMK | 10.75" (27.3 cm) | 9.8" (24.9 cm) |
| RMK KHAOS | 10.375" (26.3 cm) | 9.8" (24.9 cm) |
| PRO-RMK 174 | 10.5" (26.7 cm) | 9.625" (24.4 cm) |
| RMK ASSAULT | 10.75" (27.3 cm) | 9.8" (24.9 cm) |
160 to 220 pounds (73-100 kg)
| Model | Factory Installed Length | Minimum Installed Length |
| SKS/PRO-RMK | *10.5" (26.7 cm) | 9.8" (24.9 cm) |
| RMK KHAOS | *10.25" (26 cm) | 9.8" (24.9 cm) |
| PRO-RMK 174 | *10.25" (26 cm) | 9.625" (24.4 cm) |
| RMK ASSAULT | *10.5" (26.7 cm) | 9.8" (24.9 cm) |
*Factory setting
220 to 280 pounds (100-127 kg)
| Model | Factory Installed Length | Minimum Installed Length |
| SKS/PRO-RMK | 10.125" (25.7 cm) | 9.8" (24.9 cm) |
| RMK KHAOS | 10.125" (25.7 cm) | 9.8" (24.9 cm) |
| PRO-RMK 174 | 9.875" (25.1 cm) | 9.625" (24.4 cm) |
| RMK ASSAULT | 10.125" (25.7 cm) | 9.8" (24.9 cm) |
280 to 340 pounds (127-154 kg)
| Model | Factory Installed Length | Minimum Installed Length |
| SKS/PRO-RMK | 9.8" (24.9 cm) | 9.8" (24.9 cm) |
| RMK KHAOS | 10" (25.4 cm) | 9.8" (24.9 cm) |
| PRO-RMK 174 | 9.625" (24.4 cm) | 9.625" (24.4 cm) |
| RMK ASSAULT | 9.8" (24.9 cm) | 9.8" (24.9 cm) |
For optional 250 pound/inch stiff springs (see your dealer)
| Rider Weight | Model | Factory Installed Length | Minimum Installed Length |
| 250-300 pounds (113-136 kg) | ALL | 10.25" (26 cm) | 10" (25.4 cm) |
| 300-350 pounds (136-159 kg) | ALL | 10" (25.4 cm) | 10" (25.4 cm) |
High/Low Speed Compression Adjustment
Some models feature high-speed and low-speed compression adjustment. The advantage of a high/low compression-adjustable shock is that adjustments can be made independent of each other to fit each rider’s style and changing snow conditions.
Compression adjustments affect how the shock responds to suspension movement. High-speed compression adjustments change how the shock absorbs large impacts such as large whoops hit at speed or hard landings. Low-speed compression affects how the shock responds to relatively small and slow suspension travel changes, such as a sudden change from downhill to uphill riding.
With high/low speed shocks, the fundamentals of suspension are still true. Increasing compression results in a stiffer shock with more resistance to suspension movement and decreasing compression results in a softer shock with more suspension movement.
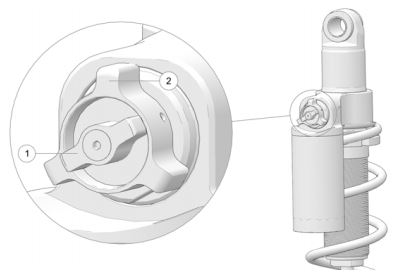
Low-Speed Compression Adjustment (Black)
To adjust the low-speed compression dampening, do the following:
1. Turn the inside clicker (1) clockwise to increase compression damping.
2. To decrease low-speed compression damping, turn the inside clicker (1) counter-clockwise.
High-Speed Compression Adjustment (Red)
To adjust the high-speed compression dampening, do the following:
1. Turn the outside clicker (2) clockwise to increase compression damping.
2. To decrease high speed compression damping, turn the outside clicker (2) counter-clockwise.
To learn more about snowmobile suspension systems, listen to the Why and How to Adjust Snowmobile Suspension episode of the Polaris Podcast.
For more information, see your Polaris Dealer. To find a Polaris Dealer near you, use the Dealer Locator.
For additional track maintenance and adjustment procedures, consult your Owner’s Manual.
To find diagrams and replacement part numbers, use the online parts catalog.
Unless noted, trademarks are the property of Polaris Industries Inc.
© 2022 Polaris Industries Inc.


