


The 2017-2018 7" Display powered by RIDE COMMAND is factory installed or can be added as an accessory on some model year 2018 and older Polaris RZR, RANGER and GENERAL vehicles. Continue reading for answers to common questions about the five-button display.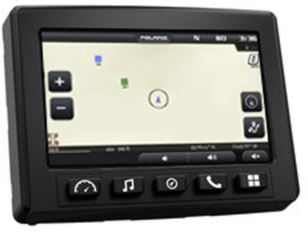
The below video contains information on the following:
- The Rider screen, Music screen, Navigation screen, Phone screen, Apps screen and pull-down Badge Panel
- How to configure and change screens
- How to access back-up cameras (if equipped)
- How to change audio sources
- How to view and change settings
- How to view ride stats
- How to access Bluetooth®
RIDE COMMAND FAQs
Q: Where can I find out more information and details about the Polaris RIDE COMMAND system?
A: You can find more information by going to the RIDE COMMAND website.
Q: Can I add a display powered by RIDE COMMAND to my vehicle?
A: Yes, the display can be added to your GENERAL, RANGER or RZR side-by-side vehicle. While the five-button display is no longer produced, the seven-button display can be added to model year 2019 and newer vehicles. It is part number 2884072. For more information on that display, read 2019+ 7" Display Powered by RIDE COMMAND FAQs.
Q: How do I import and export rides from RIDE COMMAND to my computer?
A: Select the hard Navigation button on the display. Select the Navigation Menu on the screen and then select RIDES on the screen. You will see a list of saved rides. From here you can import and export these rides via USB. Read Syncing RIDE COMMAND Data for more information.
Q: Do I need to have the 7" Display powered by RIDE COMMAND to use the app?
A: No, you do not need the display to use the Polaris App. To learn more about the Polaris App, read the Polaris App Overview.
Q: How do I update my display powered by RIDE COMMAND?
A: Visit the update section of the RIDE COMMAND website and download the provided update files. Maps and software update separately. The steps to update your vehicle are listed under the software and map update sections of the website and explained in Updating Software and Maps on the 2017-2018 7" Display Powered by RIDE COMMAND.
Note: It is recommended that you update the RIDE COMMAND software and maps every 90 days. It is recommended that the base map is updated once a year.
Q: Can I plan a ride on the RIDE COMMAND website and upload the planned route to my display?
A: A ride can be planned on the RIDE COMMAND website, downloaded to a USB drive and then uploaded to your vehicle's display. More information can be found in Planning and Uploading a Ride with RIDE COMMAND.
NAVIGATION
Q: How can I see previous waypoints and add new ones?
A: To add a waypoint, you will select the Navigation button on the display. From there you will select the Navigation Menu on the screen. This will pull up the options to see the trail map legend, see previous waypoints, add waypoints, see previous rides, record rides, and add Group Ride features. To add a waypoint, select ADD WAYPOINT.
The waypoint will drop on the map. If you select the waypoint, the menu options will appear as they did when you added the waypoint. If you select the button in the bottom-left of the waypoint menu, this will enable you to navigate to the selected waypoint. You will not get turn-by-turn directions, but it will tell you the general direction to travel. For more help on how to manage waypoints, view the video below.
Q: Will the Group Ride tracking feature still work even if I do not have the display powered by RIDE COMMAND?
A: Yes, if you have the free Polaris App, the Group Ride feature will work. Group Ride will not work if you do not have a cell phone signal. More information can be found in Using Group Ride powered by RIDE COMMAND.
Q: How do I create a Group Ride on RIDE COMMAND?
A: Read Using Group Ride powered by RIDE COMMAND for instructions and tips. For further assistance with Group Rides on RIDE COMMAND, view the video below.
Q: When will trail data be available for my location?
A: RIDE COMMAND only shows vetted and official trails. This means RIDE COMMAND relies on relationships with associations and clubs to build out our trail network of legal places to ride. We currently are working on building our relationships in underrepresented areas and hope to have more trail coverage soon. At this time, we cannot provide a date on when trail coverage will be available for a specific area. If you're involved with local trails, read Polaris Trail Manager Program to see if you qualify to contribute to RIDE COMMAND trail data.
CONNECTED DEVICES
Q: What kind of headset will connect to RIDE COMMAND?
A: Check the Supported Devices to see what headsets are officially supported by RIDE COMMAND. Other headsets may work with RIDE COMMAND, but they have not been tested and,
therefore, support cannot be offered for them.
You can use multiple headsets. You will Bluetooth®-connect one headset to the display. Using the Bridge feature on the SENA® headset, you will be able to sync the headsets together. For more information on this feature, please refer to your SENA® headset manual.
Q: How to do I connect my Bluetooth® device to the display?
A: For information on Bluetooth® pairing, read Connecting Bluetooth® Devices to the 2017-2018 7" Display Powered by RIDE COMMAND.
AUDIO AND MUSIC
Q: How can I listen to audio using RIDE COMMAND?
A: RIDE COMMAND features AM/FM, USB, Bluetooth®, Weather, and Headset audio options. You can use a USB flash drive with mp3 or .wav files, an iPhone® in iPod® mode and other supported mobile devices. RIDE COMMAND supports Android® 8.0 and above and iOS® 10 and above. To change the source of music on RIDE COMMAND, click on the music note button on the display, and in the upper-left-hand corner of the screen, there will be an option to change the source of audio. Select the circle under the word "source" (your current source of audio will be displayed), and your five audio sources will appear. To mute the radio, turn the volume all the way down or hit the mute button on the screen. For more information, read Playing Music with the 2017-2018 7" Display Powered by RIDE COMMAND.
The USB connector within the unit is NOT meant for charging mobile devices or connecting/syncing the device to your display or RIDE COMMAND account. The USB connector is strictly for USB flash drives (2.0 or 3.0) to transfer data to or from the display or to update RIDE COMMAND software, maps or trails.
Q: What speakers work with the RIDE COMMAND display?
A: MB Quart® and Rockford Fosgate® both make speakers that interface with RIDE COMMAND. See your Polaris Dealer for more information or to determine fitment.
Visit the Tutorials section of the RIDE COMMAND website for more information and the full library of five-button video tutorials.
To browse all RIDE COMMAND articles, read Guide to RIDE COMMAND for Off-Road Vehicles.
The Polaris App is available on the App Store® for iPhone® and iPad® and on Google Play®.
Visit the RIDE COMMAND website for additional information about features, displays and software/map updates.
Google Play®, Android® and YouTube® are registered trademarks of Google LLC
Bluetooth® is a registered trademark of Bluetooth Sig, Inc.
MB Quart® is a registered trademark of Maxxsonics USA Inc.
iOS® is a registered trademark of Cisco Technology, Inc.
App Store®, iPhone® and iPod® are registered trademarks of Apple Inc.
Rockford Fosgate® is a registered trademark of Rockford Corporation.
SENA® is a registered trademark of SENA Technologies, Inc.
Unless noted, trademarks are the property of Polaris Industries Inc.
© 2023 Polaris Industries Inc.

