


Taillight or Brake Light Replacement for All Sportsman 450 and 570 Models (Except X2), all Sportsman Touring Models and all Sportsman High Lifter Editions
1. Remove the harness connector from the back of the light assembly.
2. Turn the bulb counterclockwise to remove it.
3. Apply dielectric grease to the socket and install the new lamp. The bulb is part number 4010764.
4. Reinstall the harness connector.
5. Test the light for proper operation.
Taillight or Brake Light Replacement for X2
1. Open the tailgate.
2. Remove the two screws near the tailgate latch.
3. Grasp the entire light assembly and pull it away from the vehicle.
4. Remove the harness connector from the back of the light assembly.
5. Turn the bulb counterclockwise to remove it.
6. Apply dielectric grease to the socket and install the new bulb. The bulb is part number 4010764.
7. Reinstall the harness connector.
8. Test the light for proper operation.
9. Reinstall the light assembly.
10. Reinstall the two screws.
LED Taillight Replacement for Sportsman 850, XP 1000 and XP 1000 S Models
Individual LEDs are not serviceable. If the light fails to operate properly, replace the entire taillight assembly.
To replace the left taillight:
1. Remove the harness connector from the back of the light assembly.
2. Remove the three fasteners securing the light assembly and remove the light assembly.
3. Install the new light assembly and tighten the three fasteners to secure it.
4. Reinstall the harness connector. Test the light for proper operation.
To replace the right taillight:
1. Remove the heat shield covering the light assembly.
2. Remove the harness connector from the back of the light assembly.
3. Remove the three fasteners securing the light assembly, and then remove the assembly.
4. Install the new light assembly and then re-affix and tighten the three fasteners.
5. Reinstall the harness connector.
6. Reinstall the heat shield.
7. Test the light for proper operation.
To replace the center taillight:
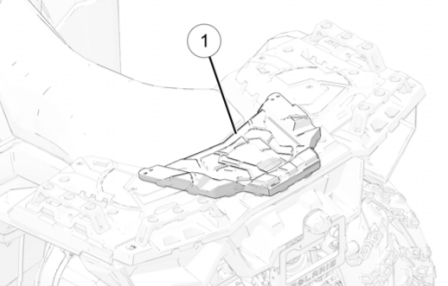
1. Remove the rear rack and rear storage box.
- Open the rear storage compartment (1).
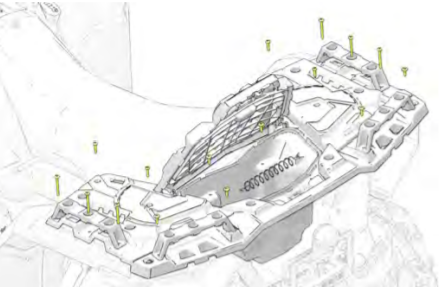
- Remove and retain the 16 screws retaining the rear rack.
2. Remove the harness connector from the back of the light assembly.
3. Remove the four fasteners securing the light assembly, and then remove the assembly.
4. Install the new light assembly and then re-affix and tighten the four fasteners.
5. Reinstall the harness connector.
6. Reinstall the rear rack and rear storage box.
- Place the rear rack in place and align the mounting holes.
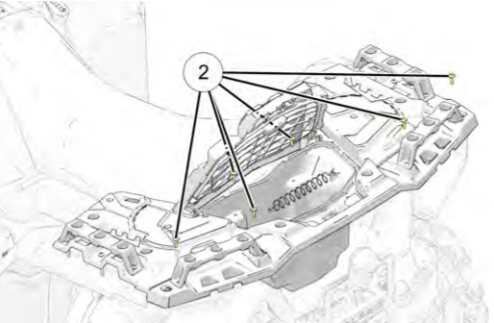
- Install the six screws (1) retaining the side extenders and torque to 36 in-lbs (4 Nm).
- Install the six screws (2) retaining the rear extenders and rear storage compartment. Torque screws to 7 ft-lbs (9 Nm).
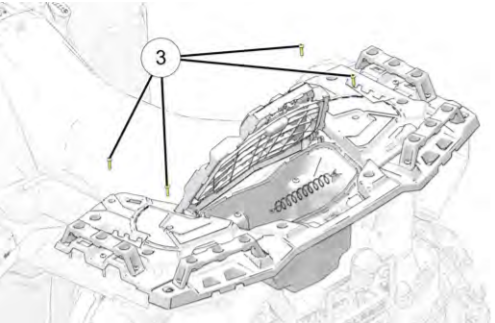
- Install the four screws (3) retaining the rear rack and torque to 18 in-lbs (2 Nm).

7. Test the light for proper operation.
LED Taillight Replacement for Scrambler 850, XP 1000 and XP 1000 S Models
Individual LEDs are not serviceable. If the light fails to operate properly, replace the entire taillight assembly.
To replace the assembly:
1. Open the rear cargo box and remove the two fasteners from the back of the light assembly.
2. Grasp the entire light assembly and pull it away from the vehicle.
3. Remove the harness connector from the back of the light assembly.
4. Reinstall the harness connector on the new light assembly.
5. Reinstall the two fasteners securing the light assembly. Test the light for proper operation.
For more maintenance procedures, consult your Owner's Manual.
The correct replacement bulb can be found by viewing the online parts catalog for your vehicle.
Unless noted, trademarks are the property of Polaris Industries Inc.
© 2022 Polaris Industries Inc.

