


Some Polaris ATV models come with a Bluetooth®-equipped gauge on the instrument cluster. On some 2021 and newer models, you can use Ride Control features like geofencing and speed limiting through the Polaris App.
If your gauge is equipped with Bluetooth®, the Bluetooth® icon will briefly display in the upper-right corner of the gauge at startup.
Before setting up your geofence or speed limiter functions for your Polaris vehicle, be sure to download the Polaris App. The app is available for iPhone® and iPad® and on Google Play®.
Be sure that the vehicle you wish to modify is entered into your RIDE COMMAND account and can be accessed in your vehicle fleet.
Adding a Vehicle on the Polaris App
Before setting a geofence or speed limit, be sure your vehicle is entered in your RIDE COMMAND account. Read How to Add a Vehicle to Your Garage for assistance.
1. When the app is connected to the vehicle, the Bluetooth® icon will show on the Rider Information Center and a green arrow will appear from the phone to the vehicle on the Vehicle Settings page in the app.
2. To add a four-digit PIN code to your vehicle, select VEHICLE SETTINGS on the app's Garage page.
3. Select CREATE PASSCODE and enter a four-digit passcode. Re-enter the passcode to confirm. Tap the check mark icon in the bottom-right side of the screen to continue.
4. Once you've set a passcode, you have the option to require the passcode to start. If the vehicle is equipped, you have the option to set a restart lock delay.
5. Tap the Bluetooth® icon to apply the changes to the vehicle.
For visual instructions, watch the video below.
Enabling a Geofence with the Polaris App
1. Open the Polaris App.
2. Put the vehicle key in the ignition and turn to the ACCESSORY position.
3. Press the MORE tab in the bottom-right corner of the app and choose GARAGE. Open the Vehicle Settings page and select VEHICLE SETTINGS. Tap ADD AREA SPEED LIMIT.
4. Tap the "+" button to create a new geofence.
5. Create a geofence boundary by tapping points on the map. The boundary will automatically close when the boundary is complete. SAVE your new geofence.
6. Name the geofence and adjust speed limits inside and outside of the fenced area. Be sure that Area Active is set to ON, with the sliding button switched to the right side of the screen.
7. Once your geofence and its settings are adjusted to your preference, tap BACK at the top of the screen.
8. Tap the Bluetooth® icon to apply geofence changes to the vehicle. Note: Only one geofence can be active on a vehicle at a time. However, the same geofence can be applied to multiple vehicles by navigating to the Areas section.
9. When the geofence is active and on, the Rider Information Center will show OUT GEOFENCE or IN GEOFENCE, depending on the location of the vehicle. The turtle icon will be illuminated, indicating that the geofence speed setting is active.
10. Previously created geofences can be accessed by using the MODE button in the middle of the Rider Information Center.
Accessing a Geofence on Your Vehicle's Display
1. Press and hold the MODE button to enter the Options Menu. "Options" will display on the screen for 3 seconds before showing the first menu item.
2. Select ADVANCED MENU by pressing the MODE button.
3. Enter your PIN.
4. Select GEOFENCE from the Advanced Menu by pressing the MODE button.
5. Toggle the UP/DOWN buttons to cycle through the options (On/Off).
6. With the desired option displayed, press the MODE button, which will set the function and return to the Advanced Menu.
7. To exit the Advanced Menu, select EXIT MENU. You can also exit the Advanced Menu by holding the MODE button or refraining from pressing any button for 10 seconds.
Setting the Inside Geofence Speed on Your Vehicle's Display
1. Press and hold the MODE button to enter the Options Menu. "Options" will display on the screen for 3 seconds before showing the first menu item.
2. Select ADVANCED MENU by pressing the MODE button.
3. Enter your PIN.
4. Select INSIDE GEOFENCE SPEED by pressing the MODE button.
Reference the image shown below.
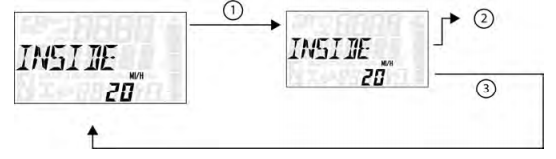
(1) Press the MODE button.
(2) Toggle the UP/DOWN buttons to increase/decrease Inside Geofence Maximum Speed.
(3) With the desired speed displayed, press the MODE button which will set the Inside Geofence Speed and return to the Advanced Menu.
5. To exit the Advanced Menu, select EXIT MENU. You can also exit the Advanced Menu by holding the MODE button or refraining from pressing any button for 10 seconds.
Setting the Outside Geofence Speed from Your Vehicle's Display
1. Press and hold the MODE button to enter the Options Menu. "Options" will display on the screen for 3 seconds before showing the first menu item.
2. Select ADVANCED MENU by pressing the MODE button.
3. Enter your PIN.
4. Select OUTSIDE GEOFENCE SPEED from the Advanced Menu by pressing the MODE button.
Reference the image below.
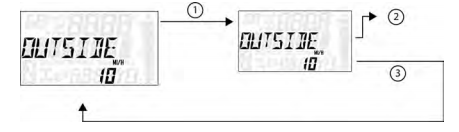
(1) Press the MODE button.
(2) Toggle the UP/DOWN buttons to increase/decrease Outside Geofence Maximum Speed.
(3) With the desired speed displayed, press the MODE button, which will set the Outside Geofence Speed and return to the Advanced Menu.
5. To exit the Advanced Menu, select EXIT MENU. You can also exit the Advanced Menu by holding the MODE button or refraining from pressing any button for 10 seconds.
Enabling Speed Limits with the Polaris App
1. Insert the key into the ignition and turn the key to the Accessory position.
2. Press MORE in the bottom right-hand side of the app and choose GARAGE.
3. Open the Vehicle page and select VEHICLE SETTINGS.
4. Under Speed, switch the Maximum Speed Limit slider to the right, enabling the Maximum Speed Limit.
5. Set your desired maximum speed limit.
6. Tap the Bluetooth® icon to apply changes to the vehicle. The turtle icon will be illuminated, indicating that the speed limit is active.
7. You can also change the maximum speed limit by pressing the MODE button located in the middle of the Rider Information Center on your vehicle's display.
Using Geofence and Speed Limits from the Rider Information Center
You can also use your Polaris vehicle's Rider Information Center to access your geofences and change speed limits.
1. Press and hold the MODE button to enter the Options Menu. "Options" will display on the screen for 3 seconds before showing the first menu item.
2. Select ADVANCED MENU by pressing the MODE button.
3. Enter your PIN.
4. Select MAX SPEED from the Advanced Menu by pressing the MODE button.
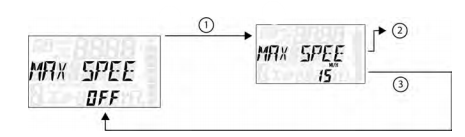
Reference the image below and follow these three steps.
(1) Press the MODE button.
(2) Toggle the UP/DOWN buttons to increase or decrease Max Speed.
(3) With the desired Max Speed displayed, press the MODE button to set the Max Speed. Return to the Advanced Menu.
5. To exit the Advanced Menu, select EXIT MENU. You can also exit the Advanced Menu by holding the MODE button or refraining from pressing any button for 10 seconds.
Consult your Owner's Manual for more information on RIDE COMMAND operations and functions.
Visit the RIDE COMMAND website to register your vehicle, update your software and learn more about RIDE COMMAND.
To browse all RIDE COMMAND articles, read Guide to RIDE COMMAND for Off-Road Vehicles.
For more information, see your authorized Polaris Dealer. Find a dealer near you with the Dealer Locator.
Bluetooth® is a registered trademark of Bluetooth Sig, Inc.
iPhone® and iPad® are registered trademarks of Apple Inc.
YouTube® and Google Play® are registered trademarks of Google LLC
Unless noted, trademarks are the property of Polaris Industries Inc.
© 2023 Polaris Industries Inc.

