


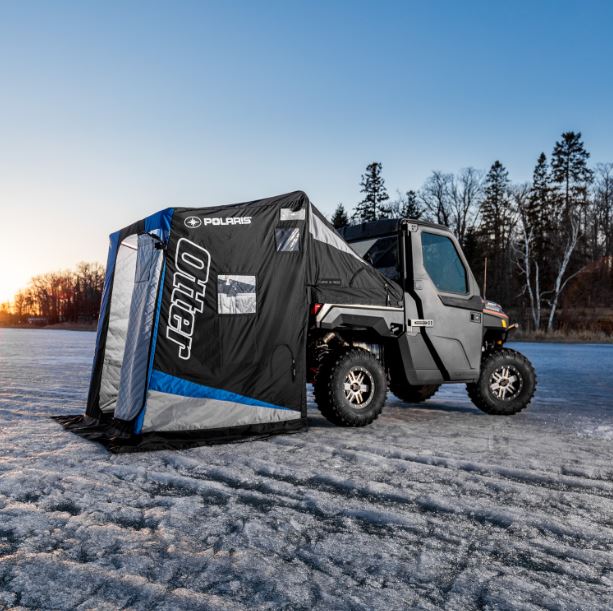
The Polaris XT Pro Lodge by Otter® is a full-thermal ice fishing lodge that attaches to your RANGER and sets up in minutes. It provides 26.5 square feet of space, comfortable for two fishermen, and fits any full-size RANGER. The Polaris XT Pro Lodge is part number 2882199. For information on how to install and set up your XT Pro Lodge, view the installation instructions.
Note: On vehicles equipped with tracks, sitting space in the lodge will be reduced slightly.
Collapsing the XT Pro Lodge
Once the shelter is set up, it's easy to take down for transport or vehicle operation.
Your XT Pro Lodge must be fully collapsed, secured with a tie-down strap and covered prior to vehicle operation.
If you are transporting the vehicle in a non-enclosed trailer, the vehicle must face forward and the shelter must be fully collapsed, secured and covered. Otherwise, the shelter must be removed.
Failure to comply may allow airflow, vibration or other factors to separate the shelter from the vehicle and cause and accident, resulting in serious personal injury or death.
To collapse the shelter:
1. Close all doors and windows.
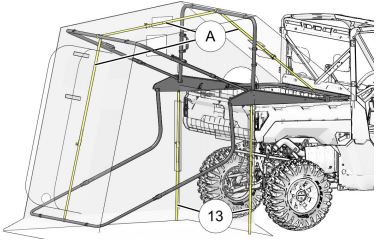
2. Loosen, collapse and remove the two curtain support pole assemblies (13) and three centerline roof support pole assemblies (A).
Place the pole assemblies in the vehicle bed, securing as required to prevent movement or damage.
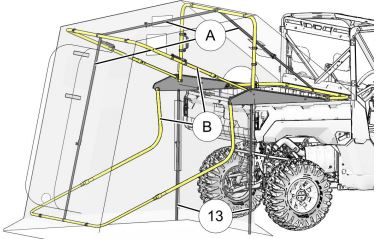
3. Depress the lock buttons (LH and RH sides) on the U-shaped door and bottom pole assemblies (B) and then fully collapse the pole frames.
Caution: Use the handles when pivoting the pole assemblies into the vehicle bed. Handles will keep fingers away from the hinge joint and prevent injury.
4. Pivot the shelter and U-shaped pole assemblies forward into the vehicle bed, neatly tucking and folding the shelter as required.
Ensure the following:
- If the shelter is frozen to the ice, do not forcibly pull it free. Fabric or seam damage may occur. Carefully chip away ice from the affected area.
- Use care when stowing gear (and shelter poles) in the vehicle bed below the shelter, especially items with hot or sharp edges. Use extra padding as required.
- Do not allow the shelter fabric to be pinched between the hinge brackets and frame poles. Use care when handling shelter windows. Rough handling, creasing or crushing may damage windows, especially in very cold weather.
- Do not pack any gear on top of the shelter.
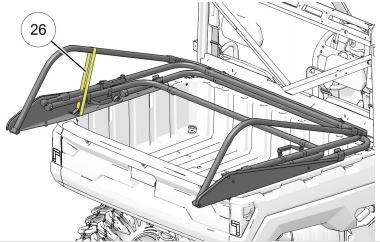
5. Secure the U-shaped pole assemblies to the left frame bracket using a tie-down strap (26). Note that the shelter is hidden from the below diagram for clarity.
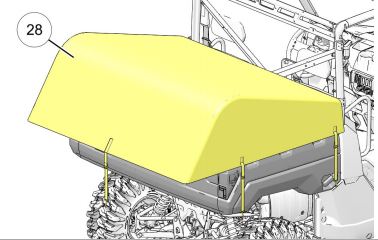
6. Install the cover (28) over the collapsed frame assembly, securing it to the vehicle using five pre-attached tie-down straps.
Use and Care
Always follow all safety labeling on the XT Pro Lodge. Also observe the following:
- Do not operate the vehicle or engine with the shelter deployed. Vehicle operation could result in injury or property damage. Engine operation may allow carbon monoxide to accumulate in the shelter. Carbon monoxide is a poison you cannot see or smell. Carbon monoxide can kill you in minutes. If you feel unwell, exit the shelter immediately.
- Fuel-burning equipment such as heaters, stoves and lanterns produce carbon monoxide. Always follow all manufacturer's instructions for proper equipment use, including equipment location and ventilation.
- Ensure the vehicle exhaust components are cool before deploying the shelter. Do not allow shelter fabric to come in contact with hot equipment or hot air. Shelter fabric and/or fabric coatings may be damaged.
To gain access to the engine compartment:
- Remove the two curtain support pole assemblies (13) and three centerline roof support pole assemblies (A) and then raise the vehicle bed.
- Reverse the procedure to restore access. Ensure the bed is fully lowered and latched.
Caution: To prevent pole damage, do not raise the vehicle bed with support pole assemblies installed. Ensure the vehicle bed is fully lowered and latched before reinstalling support pole assemblies.
To gain access to the vehicle bed (from outside the shelter):
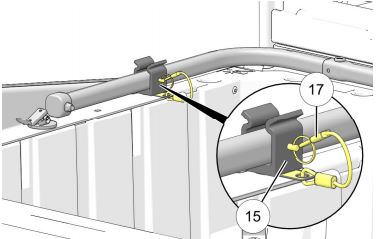
- Unzip the LH shelter side panel, reach through the opening and pull the pin (17) out of the tube holder (15).
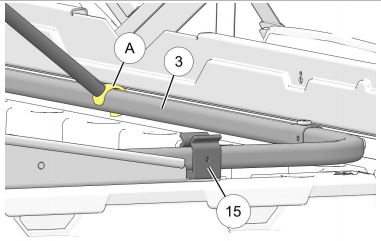
- Detach the end hook (A) from the Middle Straight Section pole (3).
- Pivot the U-shaped pole assembly up and out of the LH and RH tube holders (15).
- Reverse the procedure to restore access.
Ensure the shelter fabric is thoroughly dry before packing. Open it and air dry as required after use.
Clean the shelter fabric with warm water and mild detergent.
Finding Spare Parts
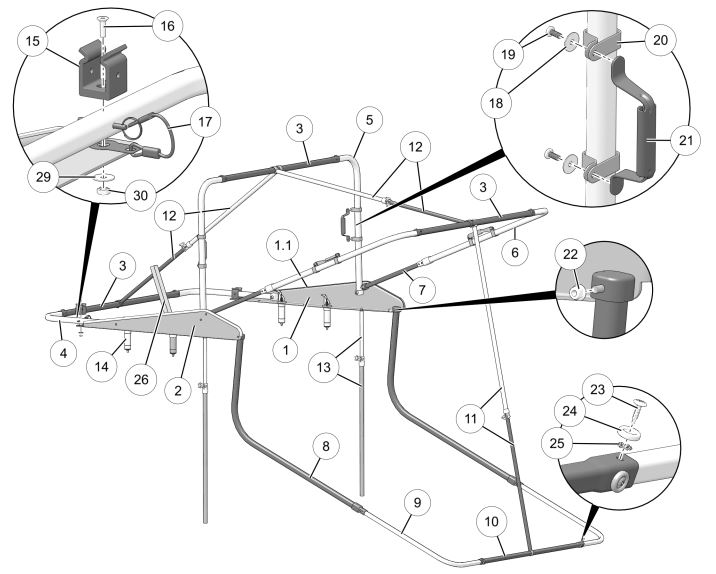
To find spare parts for the lodge, consult the above diagrams and below table. Identification numbers in the table correspond to the numbers in the diagrams. To order a part or kit, see your Polaris Dealer.
| Item | Description | Quantity | Part Number | Service Kit |
| 1 | Right Frame Bracket | 1 | — | 2207980 |
| 1.1 | Seal | 1 | — | 2206461 |
| 2 | Left Frame Bracket | 1 | — | 2207980 |
| 2.1 | Seal (not shown) | 1 | — | 2206461 |
| 3 | Middle Straight Section | 3 | — | * |
| 4 | Cargo Box Elbow (includes tube and end cap) | 2 | — | * |
| 5 | Center Elbow (includes tube and end cap) | 2 | — | * |
| 6 | Door Overhead Elbow (includes tube and tube connector) | 2 | — | * |
| 7 | Door Overhead Extension Pole (includes tube and end cap) | 2 | — | * |
| 8 | Bottom Drop Down Pole (includes tube, tube connector and end cap) | 2 | — | * |
| 9 | Bottom Elbow | 2 | — | * |
| 10 | Bottom Middle Straight Section | 1 | — | * |
| 11 | Adjustable Door Support Pole (includes inner and outer tubes, end hooks, adjustor clamp and knob) | 1 | — | 2207978 |
| 12 | Adjustable Roof Support Pole (includes inner and outer tubes, end hooks, adjustor clamp and knob) | 2 | — | 2207978** |
| 13 | Adjustable Curtain Support Pole (includes inner and outer tubes, adjustor clamp, knob and insert pin) | 2 | — | 2207978** |
| 14 | Expansion Anchor Kit, Lock & Ride | 4 | 2875250 | — |
| 15 | Tube Holder | 2 | — | 2206461 (Qty 1) |
| 16 | Screw, Hex Socket Flat Head - 1/4-20 x 7/8 | 2 | 7517652 | 2206461 (Qty 1) |
| 17 | Pin Assembly - 6 mm | 1 | — | 2206461 |
| 18 | Washer, Flat - M4 | 8 | — | 2206461 (Qty 2) |
| 19 | Screw, Phillips - M4 x 0.7 x 10 | 8 | — | 2206461 (Qty 2) |
| 20 | Clamp, Handle | 8 | — | 2206461 (Qty 2) |
| 21 | Handle | 4 | — | 2206461 (Qty 1) |
| 22 | Nut, Hex Flange, Locking - 5/16-18 | 8 | 7542343 | 2206461 (Qty 4) |
| 23 | Screw, Self-Tapping - # 8 x 3/4 | 16 | — | 2206461 (Qty 8) |
| 24 | Washer, Dome - 0.438 ID x 0.745 OD | 16 | — | 2206461 (Qty 8) |
| 25 | Washer, Star - 0.197 x 0.5 | 16 | — | 2206461 (Qty 8) |
| 26 | Strap, Tie-Down | 1 | — | 2206461 |
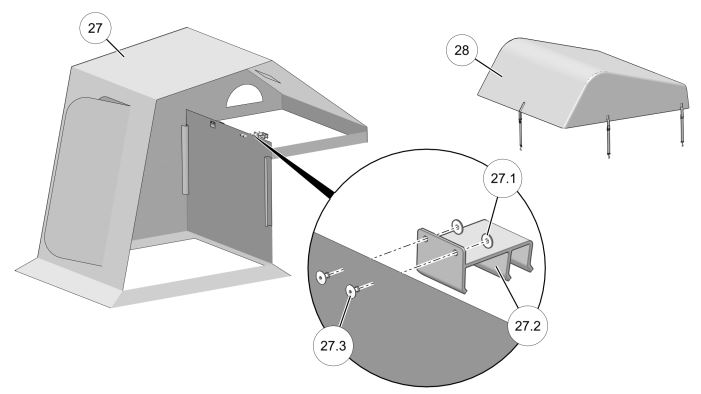
| 27 | Shelter (includes items 26.1-26.3) | 1 | 2637493 | — |
| 27.1 | Washer, Flat - 0.20 x 0.67 x 0.048 | 4 | 7556034 | 2206461 |
| 27.2 | Clamp, Tailgate | 2 | — | 2206461 |
| 27.3 | Rivet, Blind, Steel, Dome Head - 0.187 x 0.440 | 4 | 7621472 | 2206461 |
| 28 | Cover | 1 | 2637494 | — |
| 29 | Washer, Flat - 0.281 x 1.00 x 0.051 | 2 | 7556329 | 2206461 (Qty 1) |
| 30 | Nut, Hex - 1/4-20 | 2 | 7542105 | 2206461 (Qty 1) |
* Service kit 2207979 contains ONE tube of each item number (tube only, no associated parts). Related service kit 2206461 contains the following associated parts: ONE each small square tube end cap, large square tube end cap and square tube connector.
** Service kit contains ONE set of tubes (inner and outer) plus associated parts.
Otter® is a registered trademark of Otter Outdoors, LLC
Unless noted, trademarks are the property of Polaris Industries, Inc.
© 2022 Polaris Industries Inc.


