


The 7S display can be found on model year 2021 and newer Polaris snowmobiles featuring the Matryx Platform. The 7S is powered by RIDE COMMAND technology. For the latest information on RIDE COMMAND, including software updates, visit the RIDE COMMAND website.
The 7S display can be added to Matryx models that are not factory-equipped with it. See an authorized Polaris dealer for assistance.
The above video demonstrates some of the key features of the 7S display. It includes looks at the display hard buttons (0:20), left-hand controls (1:10), top bar (1:35), Badge Panel (1:48), disabling and enabling the touchscreen function (2:39), info settings (3:08), general settings (3:17), time settings (4:00), vehicle settings (4:16), gauge screen (4:39), SmartWarmers (if equipped) (5:46), pairing a Bluetooth® device (6:35) and music controls (8:11).
Driving while distracted can result in a loss of vehicle control, crash and injury. We strongly recommend that you use extreme caution when using any device that may take your focus off the trail. Your primary responsibility is the safe operation of your vehicle. We recommend against the use of any hand-held device while riding and encourage the use of voice-operated systems when possible. Be aware of all applicable local laws that may affect the use of electronic devices while riding.
If your vehicle is equipped with an electronic start, the 7S display will remain on when the key is in the ON position. After 60 seconds, the display backlight will dim and then fully shut down after 10 minutes of inactivity.
Buttons and Controls
The 7S features five buttons on the display itself: a 5-Way UI Control button (1), a Back button (2), the Up and Down buttons (3) and the Polaris button (4).
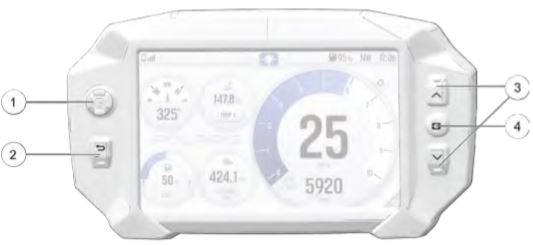
The 5-Way UI Control button (1), shown below, moves the cursor and pans the focus on the map screen.

The Back button (2), shown below, cycles all screens and backs the user out of menus.

The Up and Down buttons (3), shown below, zoom in and out of the map and scroll through lists of features.

And the Polaris button (4), shown below, opens and closes the Badge Panel.

The electronic hand controls are located on the left side of the handlebars. The hand controls operate certain RIDE COMMAND features, the headlights, reverse operation and the heated grips. On the hand controls, you'll find the Select button (5), Heat Grips button (6), Up button (7) and Back button (8).
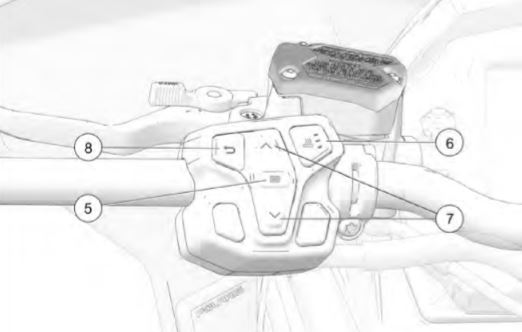
The (5) Select button, shown below, opens the Badge Panel and chooses options.

The Heated Grips button (6), shown below, activates the SmartWarmers in the handlebars and throttle lever, if equipped on your sled.

The Up button (7), shown below, zooms in and out of the map and scrolls through the list of features.
The Back button (8), shown below, cycles all screens and backs the user out of menus.
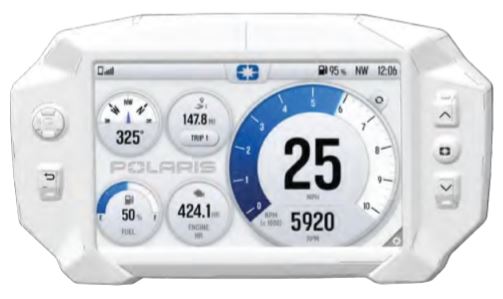
Gauge Screen
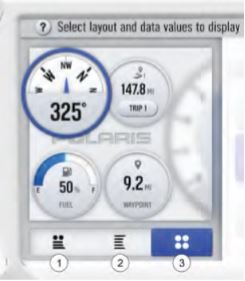
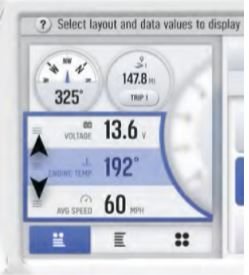
The Gauge Screen is the screen that appears upon vehicle start-up. It displays a customizable view of vehicle information, including speed, RMP, fuel level, engine temperature, engine hours, the trip meter, battery voltage and the compass.
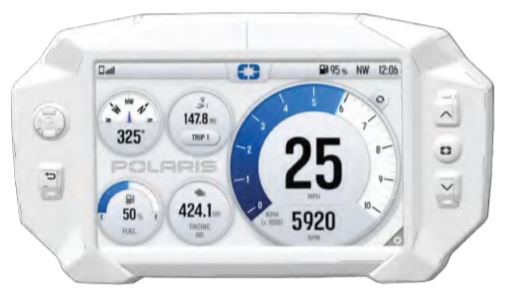
The display allows up to four customized gauge screens. All but one screen can be deleted. One always will remain as the default.
Note that in the gauge configuration panel, the display buttons and hand controls will not work. You must use the touchscreen to change screen settings and layouts.
To create customized gauge screens, follow these instructions:
1. Press the GEAR icon in the bottom right corner of the touchscreen.
2. On the right side of the configuration panel, press the SCREENS tab, followed by the ADD NEW button.
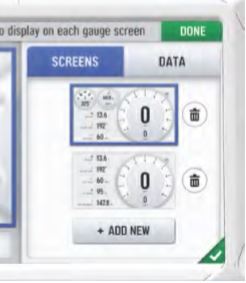
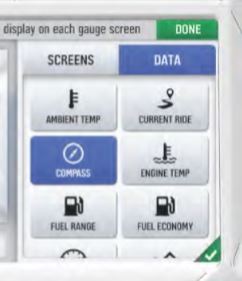
3. In the left side panel, choose a gauge layout from the three provided options.
The layout options are as follows:
- Two circular widgets and three linear widgets (1). To select this layout, choose the icon below.

- Five linear widgets (2). To select this layout, choose the icon below.

- Four circular widgets (3). To select this layout, choose the icon below. This is the configuration shown in the diagram above.

4. Select the DATA tab. Choose up to five widgets to display on the screen. Keep your software up to date as more widget options become available. For more on updating your software, read Updating Your 7S Display.
5. Reorder the widgets by pressing and holding down on the widget and then sliding the widget up or down into the desired position.
6. Click on the green check mark or DONE to close the configuration panel.
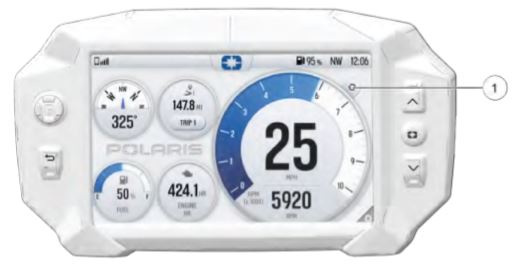
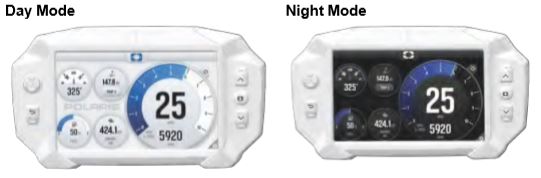
The Gauge Screen has two view modes: analog and digital. To toggle between the two, press the toggle icon (1) shown below.
Icon Bar
The Icon Bar is located across the top of the touchscreen. It displays cell phone and headset connectivity, fuel range, compass heading and local time. The Icon Bar will not appear when the Badge Panel is open.
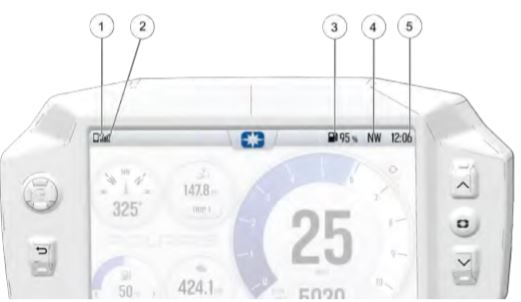
The Headset icon (1) displays if a headset is connected.
The Signal Strength icon (2) displays the current cell phone signal strength.
The Fuel Level icon (3) displays the current fuel capacity percentage.
The vehicle direction icon (4) displays the vehicle's direction.
The clock (5) displays the current time.
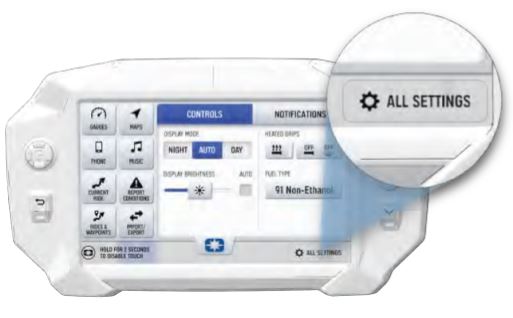
Badge Panel
The badge panel provides easy access to frequently used features, basic display and vehicle controls, and a list of recent notifications.
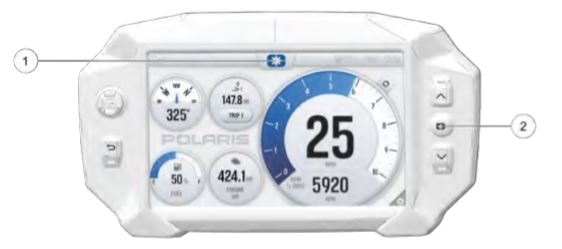
There are two ways to open the Badge Panel. Either press the Polaris icon (1) at the top of the touchscreen or use the Polaris button (2) on the right side of the display.
To disable the touchscreen, press and hold the Polaris icon for 2 seconds.
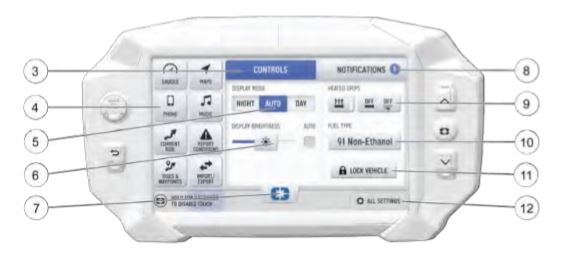
From the Badge Panel, you can access the following:
- Controls Tab (3)
- App Tray (4)
- Display Mode (5)
- Display Brightness (6)
- Badge Panel/Polaris Icon (7)
- Notifications Tab (8)
- Heated Grips (9)
- Fuel Type (10) Models affected by Safety Recall S-24-01 must use the correct fuel type for the vehicle. For information on models affected by Safety Recall S-24-01 and selecting your fuel mode, read Snowmobile Safety Recall S-24-01. For models not affected, refer to your Owner’s Manual.
- Lock Vehicle Button (11)
- All Settings Button (12)
Press the Controls Tab to change the display mode, display brightness, activate the heated grips and change the fuel type.
The display mode can be set to DAY, NIGHT or AUTO.
To select display brightness, move the touchscreen slider to the left or right. Press the AUTO checkbox to allow the screen to adjust automatically based on ambient light conditions.
The App Tray provides easy access to key features on the display screen. Tap on any of the listed icons to navigate to that display screen. For example, tap the map icon to navigate to the map screen or press the audio icon to navigate to the audio screen.
Press the Notifications tab to view DTC codes, installed software and vehicle warnings.
Read Fuel Type Selection for more on changing the fuel type. Models affected by Safety Recall S-24-01 must use the correct fuel type for the vehicle. For information on models affected by Safety Recall S-24-01 and selecting your fuel mode, read Snowmobile Safety Recall S-24-01. For models not affected, refer to your Owner’s Manual.
If your vehicle is equipped with a pin activated security system (PASS), the Lock Vehicle button will appear on the Badge Panel. Press this button to lock the vehicle before powering off the engine. To unlock your vehicle, you will be prompted to enter a preset passcode. Read Polaris Snowmobile Security System for more on that procedure.
Press the All Settings button to navigate to the settings menu. See the Settings section for more information.
To close the Badge Panel, tap the Polaris icon.
Music Screen
Your snowmobile is not equipped with a speaker system. Audio can be transmitted only through a Bluetooth® media device or headset. Only one device and one headset can be connected at a time.
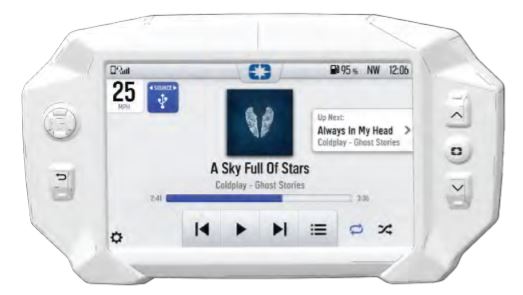
Audio playback through USB or Bluetooth® devices is compatible with your display. The Music Screen allows you to access music stored on your smartphone or other music device. You can pair your device using Bluetooth® or by connecting it to the display's USB port.
Audio playback is only available on USB flash drives formatted to exFAT® or FAT32 and operating systems iOS® 10 and Android® 5.0 or newer.
For more on connecting a headset or device to your 7S display, read Connecting Bluetooth® Devices to the 7S Display Powered by RIDE COMMAND.
Phone Screen
The Phone Screen displays recent calls, your contact list, keypad and messages. The display will only show messages received while your smartphone is paired via Bluetooth® and SHOW NOTIFICATIONS is enabled on your smartphone.
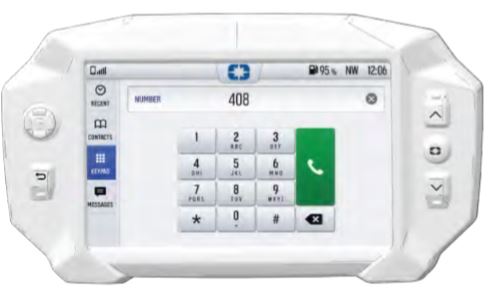
Connect a smartphone and headset to listen to audio, make and receive calls and text messages, access a phone's contact list, and view your call history. Read Connecting Bluetooth® Devices to the 7S Display Powered by RIDE COMMAND for more on connecting your smartphone to the display.
Map Screen
To access the Map Screen, press the Back button to cycle to the map screen or press the Map button from the App Tray in the Badge Panel. The map will center you based on the location of the in-vehicle GPS.
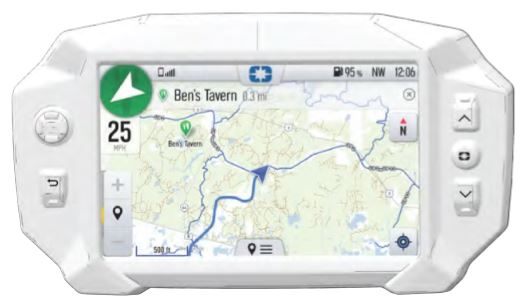
Controls on the map surface disappear after 10 seconds of inactivity. They will return if you tap anywhere on the map.
Use the plus and minus signs on the left side of the screen or pinch the screen with your fingers to zoom in and out on the map.
The waypoint icon appears when navigation is in use and the GPS is routed to a specific waypoint. Press the waypoint icon to focus on the destination point. To set the focus back to your location, press the target icon in the bottom right corner of the screen.
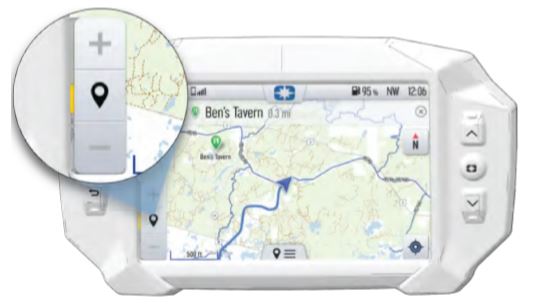
The compass icon on the right side of the screen toggles how the map orients itself during navigation. There are two orientation options: North Up and Course Up. Pressing this button also will re-center your vehicle if it is not already centered.
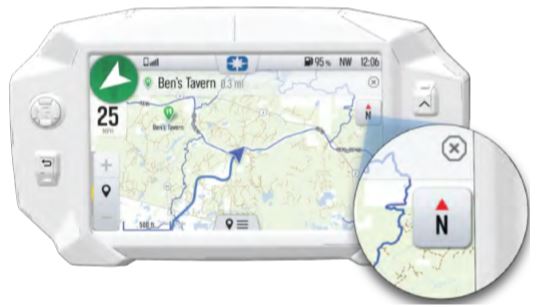
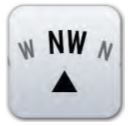
North Up view locks the map's orientation so that north is always at the top of the screen, regardless of your vehicle's position or direction. When North Up orientation is selected, the compass icon will look like this:

Course Up view rotates the map to match the direction of your vehicle. When Course Up is selected, the compass icon will look like this:
Waypoints are user-defined locations on the map. Waypoints can be saved and shared with friends.
To add a waypoint, do the following:
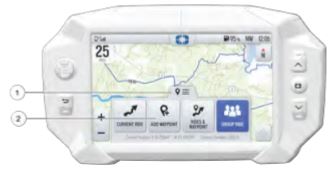
1. From the Map Screen, tap the map menu icon at the bottom of the display screen (1).
2. Select ADD WAYPOINT (2) from the available options.
Points of interest (POI), such as restaurants, gas stations, hotels, dealers and more, are available from the map screen. POI will display on the Map Screen as you zoom in and out on the map. Tap on the POI icon to view more information about that location.
Go to Nav is available from the map screen when viewing a waypoint or POI. Go to Nav will display the distance and directional bearing of the POI. Go to Nav does not provide turn-by-turn directions to a POI.
To learn more about the Group Ride function, read Using Group Ride on Your 7S Display powered by RIDE COMMAND.
Settings
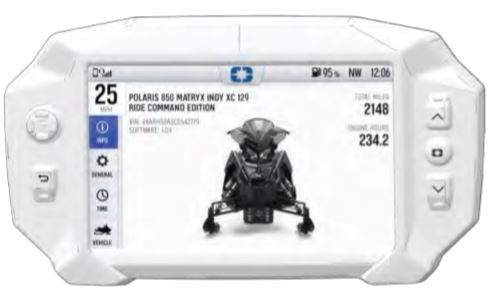
From Settings, you can view important details about your vehicle and personalize your touchscreen display. The Settings menu contains four categories: Vehicle Info, General, Time and Vehicle Settings.
To open Settings, press the Polaris button on the display and then the ALL SETTINGS button from the touchscreen.
From the INFORMATION settings tab, you can view the following:
- Vehicle Identification Number (VIN)
- Installed software version
- Mileage
- Total engine hours
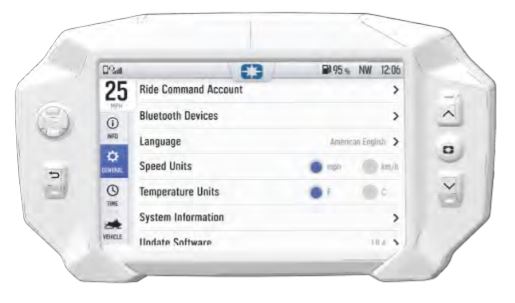
From the GENERAL settings tab, you can:
- Connect to your Polaris account
- Manage Bluetooth® devices
- Change the display language
- Set the speed units of measurement (MPH or KM/H)
- Set the temperature units (F or C)
- System information
- Update software
- Update maps and trails
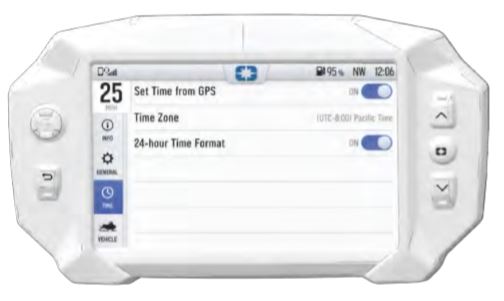
From the TIME settings tab, you can:
- Set the time from internal GPS location
- Set the time zone
- Set the time (if GPS is not enabled)
- Set the date
- Enable GPS Time (it automatically sets the time to the time zone you are currently in)
- Set the time format (12-hour or 24-hour)
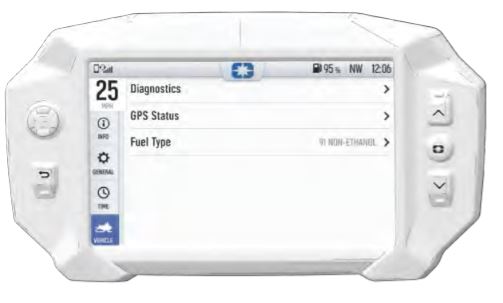
From the VEHICLE settings tab, you can:
- Access vehicle diagnostics
- GPS status
- Set the fuel type (Models affected by Safety Recall S-24-01 must use the correct fuel type for the vehicle. For information on models affected by Safety Recall S-24-01 and selecting your fuel mode, read Snowmobile Safety Recall S-24-01. For models not affected, refer to your Owner’s Manual.)
- Customize the heated grip temperatures
Maintenance
To clean the display shell, use a soft cloth with mild soap and water. Do not use hard or abrasive cleaners. For best results, use a microfiber towel to clean the screen. Certain products will damage the screen and other plastic surfaces. Do not use alcohol to clean the display. Immediately clean off any gasoline that splashes on the display.
Key Position and Power Usage
If the key remains in the RUN position after using the engine stop switch to stop the engine, the 7S display will remain active. The screen will turn off after several minutes of inactivity, but if a battery is installed, the display will continue to draw a small amount of current from the battery until the key is turned off. This feature is useful for accessing RIDE COMMAND without starting the engine, but turn the key off when the display is not in use.
The 7S display is not dependent on a battery while the engine is running. This allows the 7S to remain fully powered and retain GPS lock during a successful PERC event (forward/reverse transition). When the engine is shut off, the display will immediately power down.
For snowmobiles equipped with a battery, the 7S display will remain fully powered (battery installed) for 60 seconds when the key remains in the RUN position after the Engine Stop Switch is depressed. The display will power off automatically after 10 minutes of inactivity.
For more information, see your authorized Polaris Dealer. Find a dealer near you with the Dealer Locator.
Maintenance tips, procedures and specifications can be found in your Owner's Manual.
To find diagrams and replacement part numbers, use the online parts catalog.
Android® and YouTube® are registered trademarks of Google LLC
Bluetooth® is a registered trademark of Bluetooth Sig, Inc.
exFAT® is a registered trademark of Microsoft Corporation
iOS® is a registered trademark of Cisco Technology, Inc.
Unless noted, trademarks are the property of Polaris Industries Inc.
© 2024 Polaris Industries Inc.

